A homepage slider lets one section rotate through several images, messages, or offers. You can build one in WordPress without code, but I wouldn't make it the default hero for every website.
Use a slider when two or three ideas deserve equal space. If your homepage has one main promise and one next step, a static hero will usually be clearer, faster, and easier to maintain.
Don't add motion just because the template has it. If slide one already explains what you do and gives the visitor the right button, rotating away from it can make the page harder to use.
The original Create a Pro Website video below still shows the full Smart Slider process. Its interface is older, so use the current written steps and screenshots underneath it for the menus and publishing flow.
The workflow is still the same at a high level: install the plugin, create the slider, edit each slide, and place the finished project on your homepage.
Should you put a slider on your homepage?
The quickest answer is to compare the job each layout does. A slider is one option, not an automatic upgrade.
| My default Static hero | Homepage slider | Content carousel | |
|---|---|---|---|
| Best for | One clear offer | A few equal campaigns | Products, posts, or logos |
| Visitor action | One obvious CTA | Choose a slide | Browse several items |
| Motion | None required | Optional rotation | Manual swipe |
| Build complexity | Lowest | Highest | Medium |
| My take | Default choice | Use with a reason | Great below the hero |
Swipe to compare more options. Static hero stays pinned.
Start with the simplest layout that communicates the message. Motion has to earn its place.
I start most business homepages with one static hero. A slider makes more sense for a portfolio with several featured projects, a store rotating a few campaigns, or a site where the visitor expects to browse visual work.
Homepage slider
What a slider adds, and what it asks from the visitor
Where it works
- Several campaigns share one space A slider can rotate a seasonal offer, a service, and a featured project without building three hero sections.
- Visual work gets room to breathe Photographers, designers, and stores can show a small set of strong images without shrinking them into a grid.
- Each slide can have its own action A focused heading, short sentence, and button can lead to a specific product, service, or case study.
The trade-offs
- Later slides are easy to miss Most visitors decide what to do from the first screen, so slide one still has to carry the page.
- More moving parts Extra images, scripts, controls, and breakpoints create more opportunities for slow loading or awkward mobile layouts.
- Motion can become a distraction Fast autoplay can move a headline or button before somebody finishes reading it.
If you choose the slider, keep the decision narrow. Two or three slides, one message per slide, and one obvious action is enough.
How to add a homepage slider in WordPress
This tutorial uses Smart Slider 3 from the official WordPress plugin directory. The free version covers the workflow most beginners need, and it works with the block editor and Elementor.
Step 1: Install Smart Slider 3
- Open Plugins → Add Plugin in the WordPress dashboard.
- Search for Smart Slider 3 by Nextend.
- Click Install Now, then Activate.
- Open Smart Slider from the left dashboard menu.
Only install the plugin from WordPress.org or the developer's official account. Keep it updated just like WordPress, your theme, and every other plugin on the site. Our website security guide explains the bigger maintenance routine.
Smart Slider 3 Pro version 3.5.1.35 was compromised. The free WordPress.org version wasn't affected. If that exact Pro version was ever installed, don't treat a normal plugin update as the whole cleanup. Follow the developer's security advisory, audit the site, and reset credentials.
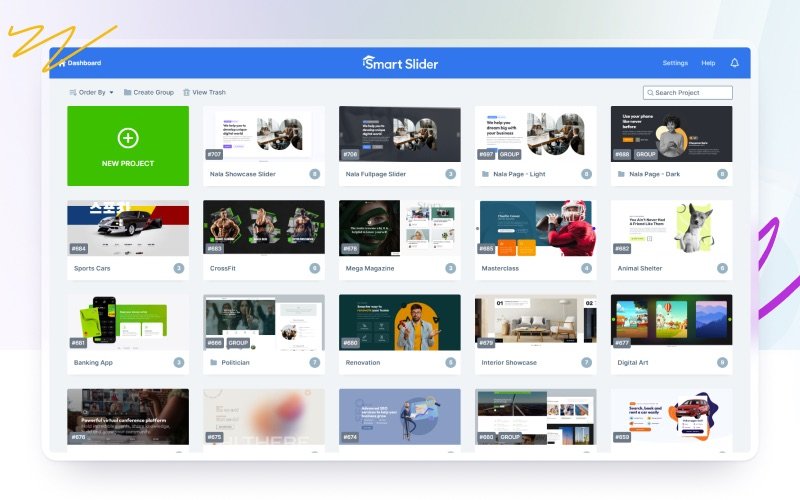
After activation, the dashboard gives you one place for saved projects, templates, settings, and new sliders.
If this is your first WordPress plugin workflow, the broader WordPress beginner tutorial shows how the dashboard, pages, plugins, and page builder fit together.
Step 2: Start with a template or a blank project
Click New Project. You can start from scratch, import a free template, or create a project around your own images. I'd use a template for the first build because the spacing, controls, and responsive structure are already there.
Pick the template for its layout, not its demo photos. A simple full-width slider with a heading, short supporting line, button, arrows, and dots is easier to customize than a layered animation showcase.
Build slide one first. If a visitor never clicks an arrow, the page should still explain what you do, who it is for, and what to do next.
The template library is useful for seeing what's possible, but your finished slider should be calmer than the gallery. Match the typography, colors, and button style already used on the rest of the website.

For a business site, that might be one service and a Get a Quote button. For a portfolio, use one project with a View the Case Study button. The CAPW website design guide covers the hierarchy around the slider.
Step 3: Edit the slide background, text, and button
Open the first slide. Replace the background image, then edit the heading, supporting copy, and button. Smart Slider uses layers, so each piece can have its own alignment, spacing, style, and responsive behavior.
- Background: use one compressed image with enough empty space behind the text.
- Heading: make one specific promise, not a vague welcome message.
- Copy: keep it to one short sentence whenever possible.
- Button: use the same primary CTA label used across the rest of the homepage.
- Controls: keep arrows and dots visible enough to discover without overpowering the content.
Save the slide, return to the project, and repeat for slide two or three. Don't duplicate a slide just to fill space.
Step 4: Configure size, motion, and controls
The project settings control the slider as a whole. This is where you choose the layout, dimensions, animation, autoplay behavior, arrows, bullets, optimization, and loading options.
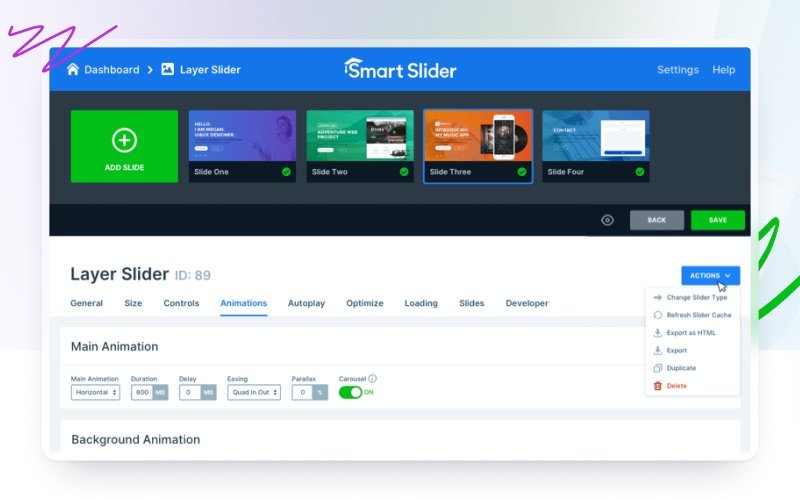
I leave autoplay off unless the rotation is essential. Manual controls give people time to read, and they avoid moving a button just as somebody tries to click it. If you turn autoplay on, slow it down and make pause, arrows, and bullets easy to find.
- Size: preview desktop, tablet, and mobile before publishing.
- Animation: use a simple horizontal move or fade instead of stacking effects.
- Autoplay: off by default; never rotate so quickly that the copy becomes a race.
- Controls: label arrows and give every slide a descriptive title.
- Images: compress files before uploading and avoid a video background unless it adds real value.
Smart Slider provides ARIA labels, keyboard-focusable controls, slide titles, and reduced-motion support, but you still have to configure and test them. The official accessibility guide shows where those settings live.
Publish the slider on your homepage
Create and edit the project inside Smart Slider first. The page editor only decides where the finished slider appears.
Add it with the WordPress block editor
- Open Pages and edit the page assigned as your homepage.
- Click the block inserter and search for Smart Slider 3.
- Insert the block, click Select Slider, and choose the project.
- Save the page and preview the public homepage in a new tab.
The official WordPress publishing documentation also covers the shortcode, widget, page-builder, and developer paths.
Add it with Elementor
- Open the homepage and click Edit with Elementor.
- Search the widget panel for Smart Slider.
- Drag the Smart Slider widget into the hero position.
- Click Select Slider and choose the saved project.
- Set the surrounding container's margin and padding to zero only if the design needs an edge-to-edge slider.
- Click Update and inspect the public page.
Don't paste the shortcode into an Elementor Text Editor widget. Use Smart Slider's own widget so the scripts and styles load correctly. If Elementor itself is new to you, follow our 15-minute Elementor tutorial first.
Use a shortcode only when the editor has no slider block
Every project includes a shortcode such as [smartslider3 slider="1"]. Paste it into a Shortcode block when a theme or builder has no native Smart Slider integration. Avoid editing theme PHP for a normal homepage placement; a block or page-builder widget is easier to maintain.
Test the slider before you call it finished
A slider that looks good inside the editor can still fail on the live page. Test the actual homepage, logged out, on a phone and a desktop.
- First screen: the first slide explains the offer before anything moves.
- Buttons: every CTA opens the correct page and remains easy to tap.
- Keyboard: Tab reaches links and controls; arrow labels make sense to a screen reader.
- Mobile: text stays readable, faces and products are not cropped awkwardly, and controls do not overlap the CTA.
- Motion: reduced-motion preferences calm the animation, and autoplay can be paused.
- Speed: the first image loads quickly and later slides do not cause a large layout shift.
If the page becomes noticeably heavier, reduce the image dimensions, convert photos to WebP or a compressed JPEG, remove extra slides, and work through the WordPress performance guide.
Keep the slider only if it improves the page. After testing, compare it with a static hero. The version that makes the message and next step clearer is the right one.
That same test applies to every visual effect. Our website design mistakes guide shows what happens when animation starts competing with the content.
Frequently Asked Questions
How do I add a slider to my WordPress homepage?
Install Smart Slider 3, create a project, build the slides, then open your homepage and insert the Smart Slider 3 block. If you use Elementor, drag in the Smart Slider widget and select the project you already created.
Is Smart Slider 3 free?
Yes. The WordPress.org version includes the visual editor, responsive sliders, image and video layers, navigation controls, and templates. Pro adds more templates, effects, layers, and dynamic-content tools.
Is Smart Slider 3 safe to use?
The current WordPress.org release is maintained. The free directory version wasn't affected by the Pro 3.5.1.35 distribution compromise. If that exact Pro version ever ran on your site, follow the developer's security advisory and treat the installation as compromised.
Should a homepage slider autoplay?
My default is no. Manual arrows and swipe controls give visitors time to read. If you enable autoplay, use a calm interval, provide pause and navigation controls, and confirm the slider respects reduced-motion preferences.
How many slides should a homepage slider have?
Two or three is usually enough. Put the strongest message first and remove any slide that repeats the same offer. A seven-slide hero is usually a content-organization problem disguised as a design feature.
Do homepage sliders slow down WordPress?
They can. Every slide may add another large image plus the plugin's scripts and styles. Use compressed WebP or JPEG files, keep the slide count low, avoid unnecessary video backgrounds, and test the finished page on mobile.
Can I use Smart Slider 3 with Elementor?
Yes. Create and edit the slider inside Smart Slider 3 first. Then open the page in Elementor, drag in the Smart Slider widget, and choose the saved slider. Elementor displays it but doesn't edit the individual slides.
What is the difference between a slider and a carousel?
A homepage slider usually shows one large message or image at a time. A carousel often shows several smaller items, such as products, posts, testimonials, or logos, and lets the visitor move through the row.
My final recommendation
Use a static hero for most business sites. Choose a homepage slider when you have two or three strong visual stories that deserve equal space, then build it with one message and one action per slide.
Smart Slider 3 gives you a straightforward WordPress block and Elementor widget, so the technical part is manageable. The real work is editing. Keep slide one strong, keep the motion calm, and test the finished homepage on a real phone.
If the slider is only one piece of a larger build, start with the step-by-step website guide.