You are building
How to Start an Online Store (2026)
Learn the foundations first. Then follow the steps at your own pace.
Starting an online store from scratch sounds like a bigger project than it actually is. If you've been putting it off because the tech feels overwhelming, this guide is going to change that.
We're going to build a complete, professional online store together — step by step, from picking your platform to making your first real sale. No developer needed. No shortcuts. Just the full process, in order, with nothing skipped.
This works whether you're selling physical products, digital downloads, dropshipping, courses, or memberships. The setup is the same for all of them, the store type only changes which plugins you add in the later steps.
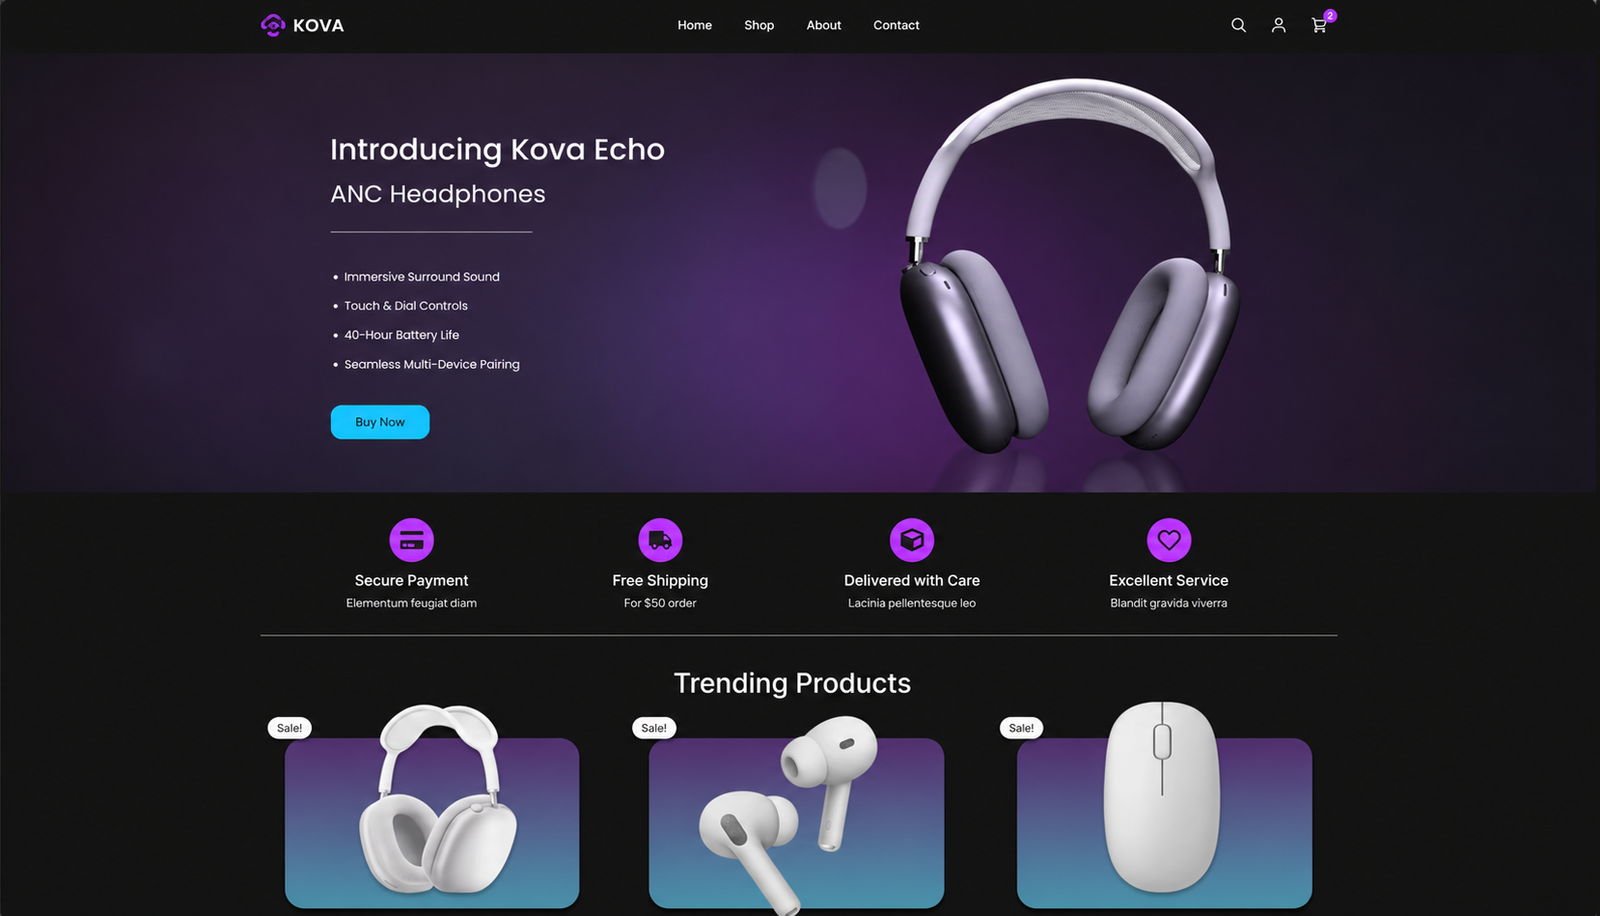
Here's what the finished store I built with this guide looks like so you get an idea of the build before we jump in:
Pick Your Platform: WordPress + WooCommerce
Why WooCommerce beats rented platforms
Before you set up hosting or install anything, you need to pick a platform. A platform is the software your website runs on — it controls everything from how your store looks to what you can sell to who owns your customer data when someone places an order.
The big choice is between a hosted platform and a self-hosted platform. Hosted platforms like Shopify or Squarespace handle the server and software for you. Fast to start, but you’re renting. The software runs on their servers, by their rules, and costs you a monthly fee whether you’re making sales or not. WordPress is self-hosted: you install the software on your own hosting account. Nobody can take your store down except you. Your data is yours. The software is free.
WordPress powers 43% of the internet — not because it’s the easiest option, but because it gives serious builders the most flexibility at the lowest long-term cost. With a good host like Hostinger, the setup is beginner-friendly. The days of wrestling with servers are over.
| Our pick WordPress + WooCommerce | Shopify | Etsy | Squarespace | Amazon | |
|---|---|---|---|---|---|
| Overall rating | |||||
| Setup effort | Easy (via host) | Very easy | Instant | Easy | Instant |
| Data & brand ownership | Full control | Platform-managed | Marketplace-owned | Platform-managed | Marketplace-owned |
| Per-sale fees | 2.9% + 30¢ (Stripe only) | 2.9% + 30¢ + monthly fee | 6.5% + listing fees | 3% + monthly fee | 8–15% referral fees |
| Design flexibility | Unlimited | Theme-based | Fixed template | Polished templates | Fixed |
| Scalability | Highly extensible | Good | Limited | Limited | High traffic reach |
| Pricing model | ~$4/month hosting | $39–105/month | Free + per-sale fees | $16–65/month | Free + per-sale fees |
| Best fit | Own brand & scale | Quick launch | Marketplace discovery | Simple stores | Massive reach |
Swipe to compare more options. WordPress + WooCommerce stays pinned.
Ranking emphasizes long-term ownership, fee structure, and brand control.
We’re using WordPress + WooCommerce for this guide. It’s the right setup for anyone who wants to own their store, keep 100% of the customer relationship, and not pay a platform fee on every sale. If you’ve already decided on Shopify, the product and marketing steps still apply — just swap out the platform-specific setup.
What Type of Store Are You Building?
The WordPress + WooCommerce setup is the same regardless of what you sell. The difference is which plugins you add on top.
- Physical products — you make or source items and ship yourself. Standard WooCommerce with Stripe + PayPal handles everything.
- Dropshipping — supplier ships directly to your customer. No inventory. Add Spocket, DSers, or AutoDS.
- Digital downloads — ebooks, presets, templates, audio. WooCommerce handles delivery automatically after payment.
- Online courses — video curriculum, student access. WooCommerce + LearnDash or LifterLMS.
- Membership sites — recurring subscriptions, gated content. WooCommerce Subscriptions or MemberPress.
Hostinger includes a free domain, free SSL, and automatic WordPress install. Our link applies the discount at checkout automatically — no code needed. Get started with Hostinger →
Sign Up for Hosting Built for Ecommerce
The foundation checkout depends on
I’ve tried a lot of hosting providers over the years. Hostinger is the one I keep coming back to — and the one I recommend without hesitation for a first store. It’s fast, beginner-friendly, and reliable in a way that cheaper options simply aren’t when traffic picks up.
Stores need more server resources than a blog or portfolio. Checkout pages must load fast — a one-second delay in page load time can reduce conversions by 7%. Customers are entering their card number; lag is unacceptable.
Go to Hostinger via our discount link so the coupon applies automatically at checkout. On WordPress.org, click Hosting in the menu — you will see WordPress's official list of recommended providers. Hostinger is on that list, which is why I use it for every store I build.
Back on Hostinger, choose the Business plan — at ~$3–4/month it gives you the CDN, extra resources, and free domain an ecommerce store needs when several shoppers are browsing and checking out at once. Set a 12-month billing cycle, then complete checkout.
Your domain registration happens in Step 2. Do not use an entry-level shared hosting plan for an ecommerce store — the Business plan's extra resources matter when traffic spikes during a promotion.
Do not use an entry-level shared hosting plan for an ecommerce store. Entry-level plans handle simple static sites fine — but when 20 people are browsing and adding to cart simultaneously during a promotion, you need the extra resources of a Business plan. The cost difference is a few dollars per month. The cart abandonment from a slow site costs far more.
Register Your Store Domain and Install WordPress
Where customers will find you
This step looks like a lot of moving parts but takes about five minutes. After checkout, Hostinger’s setup wizard starts automatically. Click Create a website, select WordPress, and create your admin login. Write these credentials down somewhere — you’ll need them every time you log in.
Choose Create a blank site — we import a full ecommerce template with WooCommerce baked in on the next step, so you don’t need an AI layout here.
Now register your free domain. Go with yourstore.com — the .com extension matters for ecommerce. Customers are entering payment details, and a familiar .com domain removes a small but real hesitation at checkout that other extensions don’t.
Hostinger installs WordPress in about 60 seconds. When it finishes, go to yourdomain.com/wp-admin and log in. Bookmark this URL. It’s your store’s control center. The left sidebar gives you access to everything: Pages, Products, Orders, Plugins, Appearance, and Settings.
Install Astra and Import a Store Template with WooCommerce
A ready-made shop structure
Go to Appearance → Themes, search for Astra, install it, and click Activate. Then open Appearance → Starter Templates. If it does not appear, install it as a plugin under Plugins → Add New first.
Here’s the step most people miss: when Starter Templates opens, click the back arrow and select Elementor as your page builder before choosing a template. It’s not obvious, but if you skip it you’ll end up with the block editor instead — and the drag-and-drop customization experience is completely different. Back button first, then Elementor. Then filter templates by Ecommerce and pick a layout that matches your product type.
Preview your chosen template, click continue, confirm that WooCommerce is checked in the features list, and click Submit and build my site. This single step installs WooCommerce, your product pages, cart, checkout, and homepage — all in one go.
When the import finishes, you have a fully structured store ready for your branding and products. You’re not building from scratch. You’re customizing a professional starting point. That’s exactly how I approach every store project, and it’s a hundred times faster.
Customize Your Store Homepage in Elementor
Make the template yours
Open the homepage and click Edit with Elementor. Replace the hero product image with your best-selling item, update the headline with your brand's value proposition, and set your CTA button text to “Shop Now” or “Browse the Collection.”
A strong store homepage answers one question in five seconds: “What do you sell and why should I buy from you?” Lead with the product, not the story.
Hit Publish every few minutes while editing. Elementor does not auto-save. One browser refresh can wipe 30 minutes of work. I’ve had it happen. Publish early, publish often.
Elementor does not auto-save. Hit Publish every few minutes while editing — especially before switching into the WooCommerce product editor. One browser refresh can wipe 30 minutes of layout work.
Add Your Products and Categories
What shoppers can actually buy
Do categories first, then products. I’ve seen people go the other way around and spend an hour reassigning everything afterward. Two minutes on categories upfront saves you the headache. Go to Products → Categories and create the buckets that match your range — “Tops,” “Accessories,” “Sale,” or whatever structure makes sense. Categories help with navigation and with Google indexing your product types separately.
Then go to Products → Add New for each item. Every product needs: a searchable title, a benefits-first description, compressed images (800×800px minimum), a price, stock quantity, and a category assignment. Describe what the customer gets, not just what the product is made of.
For products with multiple sizes, colors, or materials, choose Variable product in the product data section. Add an attribute (Color: Black, White, Navy), check “Used for variations,” and click Generate variations. WooCommerce creates a separate SKU per combination — set individual prices, stock levels, and color-specific images per variation.
Set Up Stripe and PayPal Payments
How money reaches you
Customers expect both credit cards and PayPal at checkout — offering only one will cost you sales. WooCommerce makes both simple to connect.
Go to Plugins → Add New, search “WooCommerce Stripe,” install and activate it. Connect your Stripe account in the plugin settings — create a free account at stripe.com if you do not have one. Then enable PayPal under WooCommerce → Settings → Payments.
Once both are connected, view your checkout page and confirm you see Stripe card entry fields and a PayPal option side by side.
Now do the test transaction. Enter your own card, complete the order, confirm the email arrives in your inbox, then refund yourself. This takes five minutes. It’s the only way to catch a broken checkout before your first real customer runs into it — and most customers won’t tell you what went wrong, they’ll just leave.
Never launch a store without completing a real test transaction. Enter your own card, complete the order, verify the confirmation email arrives, then refund yourself. Broken checkout loses every sale silently — most customers will not tell you what went wrong.
Configure Shipping and Create a Welcome Coupon
The rules after purchase
Shipping feels complicated until you realize most stores really only need two methods: a flat rate and a free shipping threshold. Go to WooCommerce → Settings → Shipping, add a zone (like “United States”), and add both methods inside it. Set your flat rate at a reasonable standard cost, then set free shipping to kick in at a minimum order amount — say, free over $75. Drag free shipping above flat rate so it applies automatically when the cart qualifies. That threshold quietly pushes average order value up without you doing anything else. — for example, “United States.” Inside the zone, add a Flat Rate method with your standard cost. Add a Free Shipping method with a minimum order threshold to incentivize larger carts.
For launch, create a welcome coupon under Marketing → Coupons → Add Coupon. A 10% first-order code (WELCOME10) converts cold traffic into first-time buyers. Set a usage limit so the code can only be used once per customer.
Starting Without Inventory — Dropshipping
You do not need a warehouse to start an online store. Dropshipping means a supplier ships directly to your customer when a sale comes in — you list the products, set the margin, and keep the difference. The WooCommerce setup is identical to a stocked store. Fulfillment just happens elsewhere.
Connect a dropshipping plugin — Spocket, DSers, or AutoDS — to WooCommerce from the Plugins menu. These plugins let you import supplier products directly into your store with one click. Always order a sample of anything you plan to sell publicly. Your reputation depends on what arrives at your customer's door.
If dropshipping is your model, a page targeting “how to start an online store without inventory” is one of the lowest-competition terms in ecommerce.
“How to start an online store without inventory” is one of the lowest-competition search terms in ecommerce (KD 5). If dropshipping is your model, building a page specifically targeting this keyword is a genuinely easy ranking opportunity.
Selling Courses Online with WordPress
Selling online courses is one of the highest-margin models available. You create the content once and sell it indefinitely — no inventory, no shipping, no fulfillment. “How to sell courses online” has a traffic potential of 88,000 monthly visits, making it one of the most valuable ecommerce search terms to target.
The WordPress setup is straightforward. Install WooCommerce for the payment layer, then add a course plugin:
- LearnDash — the most powerful option. Full curriculum builder, quizzes, certificates, student progress tracking. Best for comprehensive courses.
- LifterLMS — similar features with a strong free tier to start. Good for coaches and educators launching their first course.
- Tutor LMS — clean interface, free core plugin, easy to get started quickly.
Build your course curriculum in the plugin, connect it to a WooCommerce product, set your price, and students get access immediately after purchase. No third-party platform taking 30% of your revenue. Your students, your data, your pricing.
Platform fees on Teachable and Kajabi add up fast — a one-time LearnDash license on $3/month hosting pays for itself quickly at scale.
Teachable and Kajabi take 5–10% of your revenue or charge $119–149/month. At $10,000/month in course sales, that is $600–1,000/month in platform fees. A $200 LearnDash license on $3/month Hostinger hosting pays for itself on your first course sale.
Creating a Membership Site with WordPress
“How to create a membership site” has a keyword difficulty of 2 — essentially uncontested — and memberships are one of the most powerful business models available. Recurring monthly revenue, predictable income, and a built audience that compounds over time.
WordPress handles memberships cleanly with the right plugins:
- MemberPress — the most complete membership plugin. Handles recurring billing, content access rules, member dashboards, and integrates with most email and course tools.
- WooCommerce Subscriptions — adds recurring payment support to WooCommerce so members pay monthly or annually the same way they would buy a product.
- Paid Memberships Pro — free core plugin with a strong feature set for simple membership tiers.
The membership model works for any content type: exclusive articles, private video libraries, community access, monthly templates, coaching programs, or a combination. Set up membership tiers (free, monthly, annual), assign content access rules, and let WooCommerce handle the billing automatically.
Mobile Check and Go Live
Final checks before launch
Over half of ecommerce browsing happens on phones. In Elementor's mobile view, verify that your product grid collapses to a clean single column, the Add to Cart button is thumb-sized, and checkout form fields are comfortable to fill on a small screen.
Video backgrounds in hero sections often lag on mobile — hide them using Elementor's responsive show/hide options and show a static image instead on mobile.
When everything looks good, flip your store from Coming Soon to Live in WooCommerce. That’s it — you’re open.
Before you share your URL anywhere, run through this checklist:
- 5+ products live with images, descriptions, and prices set
- Stripe and PayPal connected — real test purchase completed and refunded
- Shipping zones configured and covering every region you ship to
- Privacy policy and refund policy pages linked in the footer
- Order confirmation email tested and received in your inbox
- Mobile checkout completed on a real phone
- Coming Soon mode disabled in WooCommerce settings
Frequently Asked Questions
How much does it cost to start an online store?
About $3–4/month for Hostinger Business hosting, plus a free domain in year one. WooCommerce, Astra, and Elementor are free. Stripe charges ~2.9% + $0.30 per transaction with no monthly fee. Total first-year cost under $60 — versus $468 minimum for Shopify Basic before transaction fees.
WooCommerce or Shopify — which should I choose?
Shopify if you want zero technical overhead and are comfortable paying $39+/month indefinitely. WooCommerce if you want full ownership, lower long-term cost, and complete design control without app dependencies. The full comparison breaks down every difference.
Can I start an online store without inventory?
Yes — dropshipping through WooCommerce plugins like Spocket or DSers lets you sell products a supplier ships directly to your customer. You never hold stock. The WooCommerce setup is identical to a stocked store — the only difference is fulfillment. Always order a sample before listing publicly.
How do I sell courses or memberships online?
WooCommerce handles the payment layer for both. Add LearnDash or LifterLMS for courses, and MemberPress or WooCommerce Subscriptions for recurring memberships. You control the pricing, the access rules, and the student data — no third-party platform taking 5–30% of your revenue. See the dedicated sections above for full setup details.
How do I accept payments on WooCommerce?
Install the free Stripe gateway plugin for credit and debit cards, and enable PayPal under WooCommerce → Settings → Payments. Both connect in under 10 minutes. Run a real test transaction before launch — enter your own card, complete the order, confirm the confirmation email, then refund yourself. Do not skip this step.
You’re Ready to Sell
That’s the complete stack: WordPress, WooCommerce, Astra, Elementor, Stripe, PayPal, and a store that’s 100% yours. No monthly platform fee. No marketplace cut. No third party between you and your customers.
The most common reason people don’t finish is analysis paralysis — spending weeks comparing options instead of picking one and starting. The setup you just built is the same one I use on every client project. It works. Ship it.
Once you’re live, the next priorities are traffic (SEO and social) and email (capturing addresses from day one). But those are problems for a live store. Get the store up first.