
A WordPress contact form gives visitors a clear way to reach you without publishing your email address across the site. For a first form, I recommend WPForms Lite. It is free, the builder is easy to understand, and the Simple Contact Form template gets the useful parts in place fast.
The form itself is only half the job. We also need the notification to reach the correct inbox, the Reply-To address to work, spam protection to stay usable, and the live page to pass a real submission test.
If the WordPress dashboard still feels unfamiliar, start with the complete WordPress tutorial. This guide assumes you can install a plugin and edit or create a page.
Quick answer: use WPForms Lite
Install WPForms Lite from the official WordPress plugin directory, create a form from the Simple Contact Form template, confirm the notification settings, add spam protection, embed the form on a Contact page, and submit it yourself from a private browser window.
My starting setup: Name, Email, and Message. Keep the form short, send notifications to an inbox you check, use a From Email on your own domain, and test both the confirmation and the notification before sharing the page.
Here is Dale's current full WordPress and Elementor walkthrough if you want to see the contact-form section inside a complete website build. The written steps below stay focused on the form.
Building the rest of the site at the same time? The website setup guide gives you the larger order of operations, then routes you into the right guide for your site type.
Choose one WordPress contact form plugin
You can build a contact form several ways. The best choice is the one that gives you a clear editing and testing workflow without duplicating tools you already pay for.
| Start here WPForms Lite | Contact Form 7 | Elementor Pro | |
|---|---|---|---|
| Starting cost | Free | Free | Paid Elementor plan |
| Visual builder | Yes | Limited | Yes |
| Best fit | Most beginners | Simple code-friendly setups | Sites already using Elementor Pro |
| Embed path | Block, wizard, shortcode, or Elementor widget | Block or shortcode | Elementor Form widget |
| Main trade-off | Advanced features require upgrades | More manual setup and styling | Too much if you only need one free form |
Swipe to compare more options. WPForms Lite stays pinned.
Use one main form builder. Keeping several form plugins active for old forms makes notifications, styling, spam controls, and future maintenance harder to trace.
I would use WPForms Lite for most first websites. Contact Form 7 still works when you prefer its simpler, more manual setup. Elementor Pro Forms makes sense when the site already uses Elementor Pro and you want the form designed inside the same editor.
My recommendation
WPForms Lite for a first contact form
Why it works for beginners
- Useful template The Simple Contact Form template starts with the fields most websites need, so you can edit instead of building from zero.
- Visual editing Fields, labels, settings, and notifications live in one clear builder with no code required.
- Flexible placement You can place the same form with the block editor, WPForms embed wizard, shortcode, or Elementor widget.
Where the free version stops
- Advanced workflows cost more Conditional logic, advanced fields, deeper integrations, and other specialized features may require a paid plan.
- Email delivery is separate A working form does not guarantee a notification will reach the inbox. Your sender address and mail delivery still need testing.
- It adds another plugin Keep WPForms updated, remove abandoned forms, and avoid running another full form builder beside it without a clear reason.
This follows the same one-plugin-per-job rule from our WordPress plugin guide. If an old form builder is still active, identify every live form before removing it.
Before you create the form
Decide what the form is for. A generic contact form collects a name, email address, and message. A quote request may need a service dropdown. A support form may need an order number. Do not turn every possible follow-up question into a required field.
| Field | Use it when | Default |
|---|---|---|
| Name | You need to address the person | Required |
| You plan to reply | Required | |
| Message | The visitor needs room to explain | Required |
| Subject or topic | It routes inquiries to different people | Optional |
| Phone | A phone follow-up is part of the process | Optional |
| Budget | It changes who should handle the lead | Usually optional |
| File upload | A screenshot or document is essential | Specialized |
If the website is meant to generate leads, the business website guide shows where the form fits beside services, proof, location details, and calls to action. Portfolio sites can use the same setup after the case studies in the portfolio guide.
Short wins. Ask only for information you will use before the first reply. You can collect the rest after the visitor has decided to start the conversation.
Step 1: install WPForms Lite
In WordPress, go to Plugins → Add New Plugin. Search for WPForms Lite, confirm the result is the official WPForms plugin, select Install Now, and then choose Activate. If you want the dashboard basics first, our plain-English WordPress guide explains where plugins fit.
After activation, open WPForms → Add New. Give the form a clear internal name such as “Main Contact Form.” That name helps later when the site has a quote request, newsletter signup, or support form beside it.
Step 2: create the Simple Contact Form
Choose the Simple Contact Form template. It gives you a useful base without asking you to arrange every field from scratch.
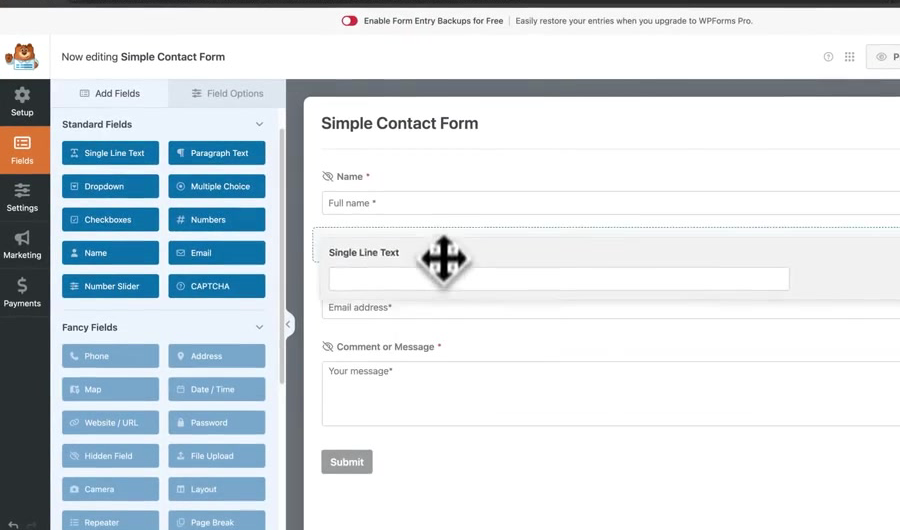
Click any field to change its label, description, required setting, placeholder, or other available options. Drag fields to reorder them. Remove anything you do not need.
This clip shows the live WPForms editor while a simple form is being adjusted. The exact field list can change, but the workflow stays the same: add from the left, edit on the form, and save.
Open Settings → Confirmations and write a useful success message. Tell the visitor that the form arrived and when they should expect a reply. Do not leave them wondering whether the button worked.
Step 3: configure the notification email
Open Settings → Notifications. Make sure notifications are enabled and check the four fields that determine whether the message reaches you and whether replying works.
- Send To Email Address: the inbox that should receive new inquiries.
- From Name: a recognizable site or business name.
- From Email: an address on your website domain that matches the authenticated mail setup.
- Reply-To: the visitor's Email field, so replying to the notification starts a message to that person.
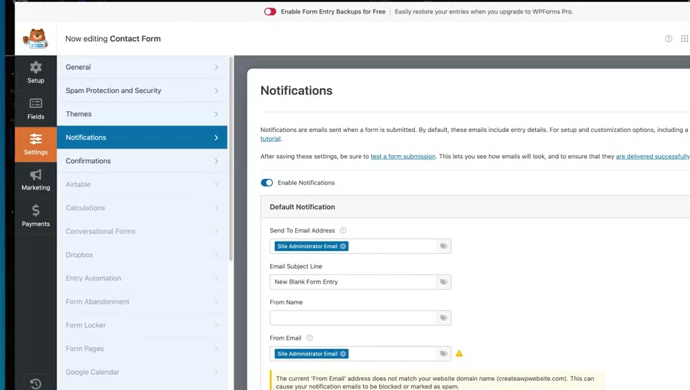
The notification screen will warn you when the From Email does not match the website domain. This frame shows the setting and the warning in context.
A custom-domain sender address helps the form email line up with the website. If you still need one, the custom-domain Gmail guide explains the mailbox and sending setup.
A green success message does not prove the email arrived. WordPress can accept the form while the notification is filtered, rejected, or routed to spam. Test the inbox separately.
Fix WordPress form email delivery
WordPress sends site emails through its mail layer. Some hosts deliver those messages reliably. Others need an authenticated mail service through an SMTP plugin.
- Start with the settings. Check the recipient, sender domain, Reply-To field, and notification toggle.
- Check spam and filters. Search for the subject line and the From Email.
- Use authenticated delivery. Connect an SMTP plugin to a real mail provider when normal WordPress mail does not deliver consistently.
- Retest from a private window. Confirm both the on-page message and the inbox notification.
Do not install several SMTP plugins at once. One authenticated mail path is easier to diagnose. Keep a note of the provider, sender address, and plugin that owns delivery.
Step 4: add spam protection and handle privacy
WPForms includes basic anti-spam protection. If bots still reach the inbox, open Settings → Spam Protection and Security and add one stronger method such as Cloudflare Turnstile, hCaptcha, reCAPTCHA, or Akismet.
Use the least annoying control that stops the spam. A challenge that blocks real visitors is not a win. Test the form on a phone, on slower connections, and with browser privacy tools after changing protection.
A contact form also collects personal information. Explain what you collect and why, limit access to entries, delete data you no longer need, and keep WordPress and the form plugin updated. The website security guide covers updates, roles, backups, monitoring, and recovery.
Privacy rules depend on the data, audience, location, and business. Do not copy a giant legal disclaimer into the form and assume the job is done. Get qualified advice when the form collects sensitive data or serves regulated users.
Step 5: add the form to a WordPress page
The simplest path is the WPForms embed wizard. Select Embed in the form builder, choose an existing page or create a new Contact page, and let WPForms place the form block for you.
You can also edit a page in the block editor, add the WPForms block, and select the saved form. Publish or update the page, then open the public URL in a new tab.
Add WPForms with Elementor
Edit the Contact page with Elementor. Drag the WPForms widget into the correct section, choose the saved form from the dropdown, and update the page.
Here is the widget inside a real Elementor contact section. WPForms still owns the form and notifications; Elementor controls its placement and the surrounding page design.
The Elementor tutorial covers sections, spacing, typography, and mobile controls if the form looks cramped or disconnected from the rest of the page.
Step 6: test the complete contact form
Open the live page in a private browser window so you are testing what a visitor sees. Work through the whole sequence, not only the Submit button.
- Submit an empty form. Required-field errors should be clear.
- Enter an invalid email. The form should reject it before submission.
- Send a real message. Use an address you can open.
- Read the confirmation. Make sure it gives a useful next step or response window.
- Check the receiving inbox. Confirm the message arrived and contains every field.
- Reply to the notification. The new email should address the visitor, not your own website.
- Check spam protection. Confirm the form still submits normally.
- Repeat on a phone. Labels, fields, privacy text, and the button should fit without sideways scrolling.
If the site matters to the business, add the contact form to the same recurring checks as the homepage, checkout, login, and backups. Forms can break after mail-provider changes, plugin updates, DNS edits, or aggressive spam rules.
Common WordPress contact form problems
Most failures fall into a few predictable groups. Start with the symptom instead of changing several settings at once.
| Problem | First check | Then try |
|---|---|---|
| Form submits, no email arrives | Recipient, From Email, spam folder | Authenticated SMTP delivery |
| Reply goes to the website | Reply-To setting | Select the visitor Email field |
| Too much spam | Built-in anti-spam is enabled | Add one CAPTCHA or filtering method |
| Form looks broken on mobile | Live page at phone width | Reduce columns, padding, and required fields |
| Visitors abandon the form | Required field count | Remove fields you can ask later |
| Changes do not appear | Form and page were both saved | Clear page, plugin, host, and CDN caches |
Change one thing, run one test, and write down what happened. That approach is slower for five minutes and much faster than creating three new problems while chasing the first one.
When to upgrade WPForms
Keep WPForms Lite when a basic form, notification, and spam setup handles the job. Upgrade only when you can name the feature that saves time or supports a real workflow, such as conditional logic, advanced fields, file uploads, multi-step forms, deeper integrations, or specialized payment and lead tools.
You can review the available paid options through our WPForms link. Do not buy a large feature set for a form that only needs Name, Email, and Message.
The right upgrade reduces a known limitation. If you cannot point to that limitation yet, keep the free form and spend the time testing the page visitors already use.
Frequently Asked Questions
Can I create a WordPress contact form for free?
Yes. WPForms Lite includes a free Simple Contact Form template, standard fields, email notifications, basic spam protection, and several ways to embed the form. You only need a paid plan when a specific advanced field, integration, automation, or workflow requires it.
Does WordPress have a built-in contact form?
Self-hosted WordPress.org does not include a native contact form. Install a form plugin such as WPForms Lite or Contact Form 7. WordPress.com is a different hosted service and includes its own Form block on supported plans.
What fields should a basic contact form include?
Start with Name, Email, and Message. Add a subject or topic dropdown only when it helps route the inquiry. Phone numbers, budgets, addresses, and file uploads should earn their place because every extra required field gives a visitor another reason to leave.
Why am I not receiving WPForms notification emails?
First check that notifications are enabled, the recipient is correct, and the From Email uses your website domain. Then submit another test while logged out and check spam. If delivery is still unreliable, configure an authenticated mail service through an SMTP plugin and test again.
How do I stop spam in a WordPress contact form?
Keep the built-in anti-spam protection enabled and add Cloudflare Turnstile, hCaptcha, reCAPTCHA, Akismet, or stricter filters when your spam volume calls for it. Do not add several challenges at once. Pick one method, test it on mobile, and make sure real visitors can still submit.
Can I add WPForms to an Elementor page?
Yes. Edit the page with Elementor, drag the WPForms widget into the contact section, and choose your saved form. The form remains managed in WPForms, while Elementor controls where it appears on the page.
Should my contact form store entries in WordPress?
That depends on the workflow and data you collect. Stored entries provide a backup when an email notification is missed, but they also create data you must protect and delete appropriately. Collect the minimum information you need and document how long you keep it.
How do I test a WordPress contact form?
Open the live page in a private window and test required fields, an invalid email, a successful submission, the confirmation message, the notification inbox, the Reply-To behavior, spam protection, and the mobile layout. A success message alone does not prove the email arrived.
Publish the form, then prove it works
For most first websites, WPForms Lite is the cleanest free route. Build a short form, configure the recipient and sender correctly, add one reasonable spam layer, publish it with the block editor or Elementor, and test the entire conversation from the live page to the inbox.
Then schedule another test after major WordPress, plugin, hosting, DNS, or email changes. A contact form earns its place by delivering real messages, not by looking finished in the editor.