OpenClaw is a self-hosted gateway that connects an AI assistant to your computer, tools, and chat apps. In this tutorial, we're going to install it, connect a model, open the dashboard, lock down access, and give it one useful job. You don't need to build a giant automation system on day one.
The goal is simple: get one private assistant running, prove that it can complete a small task safely, then add channels and tools one at a time. That order saves you from debugging five moving parts at once.
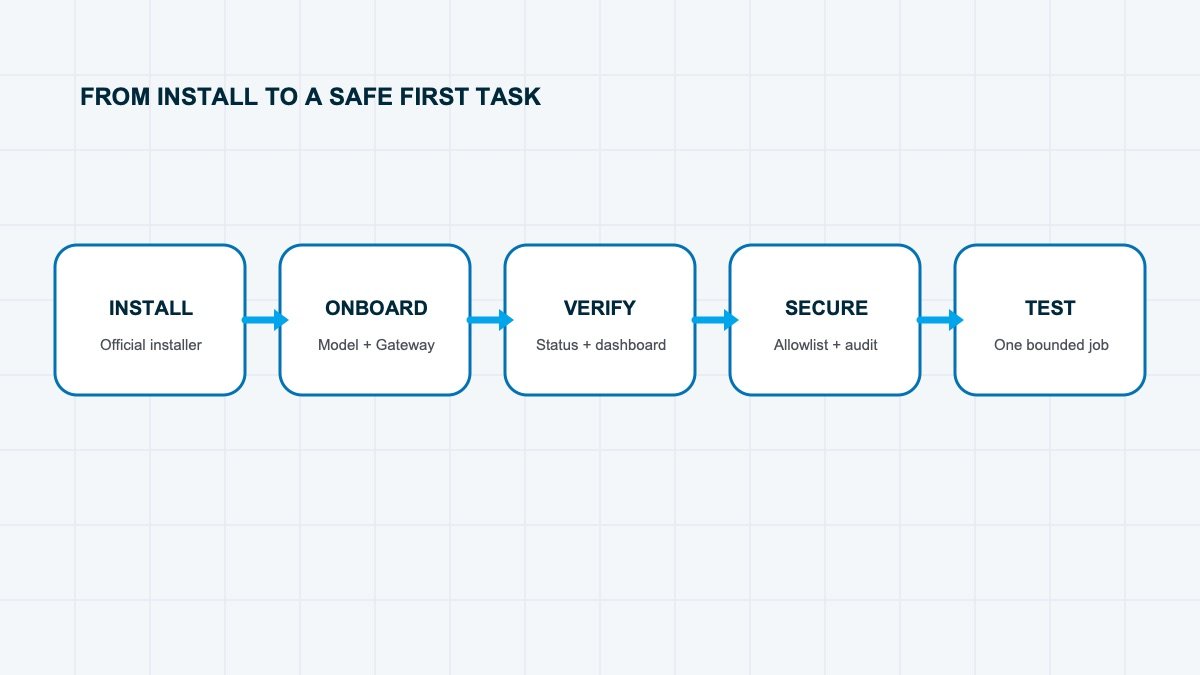
Quick answer: Install OpenClaw, run openclaw onboard --install-daemon, verify the Gateway with openclaw gateway status, then launch openclaw dashboard. Start in the browser before connecting Telegram, Slack, WhatsApp, or any other channel.
If you'd rather follow the setup on screen, this walkthrough shows the one-click install, Telegram connection, skills, Google Workspace setup, and first real task from start to finish:
Keep this written guide open beside the video so you can copy the commands, check each security setting, and troubleshoot without scrubbing backward.
In the walkthrough, I use the easiest beginner setup: a small Hostinger VPS with its managed OpenClaw installer. You can install OpenClaw on your own computer, but then the assistant stops whenever that computer sleeps or goes offline. A VPS keeps it available 24/7 without asking you to turn your everyday laptop into a server.
I explain OpenClaw as three pieces because it makes the technical stuff much less intimidating. The body is the computer or VPS where it runs. The brain is the AI model, such as Claude or ChatGPT. The instructions are the skills, permissions, memory, and scheduled jobs that tell the assistant what it may do. If one part breaks, you know where to look instead of treating the whole system like one mysterious robot.
What you need before installing OpenClaw
For the one-click route shown in the video, you need a VPS account, a model provider, Telegram on your phone, and a Google account only if you want calendar, Drive, or Gmail access. If you choose the manual local install instead, OpenClaw's current quick-start requires Node.js 22.19 or newer, with Node 24 recommended.
- A place for OpenClaw to run. Use a VPS for an always-on assistant or your own computer for a local test.
- A model provider account. OpenClaw is the assistant shell. The model still comes from a provider.
- A machine you control. The Gateway can reach files and tools you authorize, so don't install it on a random shared computer.
- One small first job. Pick something easy to verify, such as summarizing a folder of notes or producing a daily checklist.
If you're still deciding whether the ongoing model and hosting costs make sense, remember that the software can be free while the complete setup usually isn't. Model usage and always-on hosting are separate costs.
Step 1: choose where OpenClaw will run
You have three practical choices. Run it on your normal computer if you only want to experiment. Use a separate computer if you want local control without giving the assistant access to your daily machine. Use a VPS if you want it online all day and reachable from Telegram wherever you are.
In the video, I use a Hostinger VPS because the managed OpenClaw option handles the server setup in one click. The server and AI usage are separate costs. A small VPS is usually enough for a beginner assistant, while model usage depends on how often you call it and which model you choose.
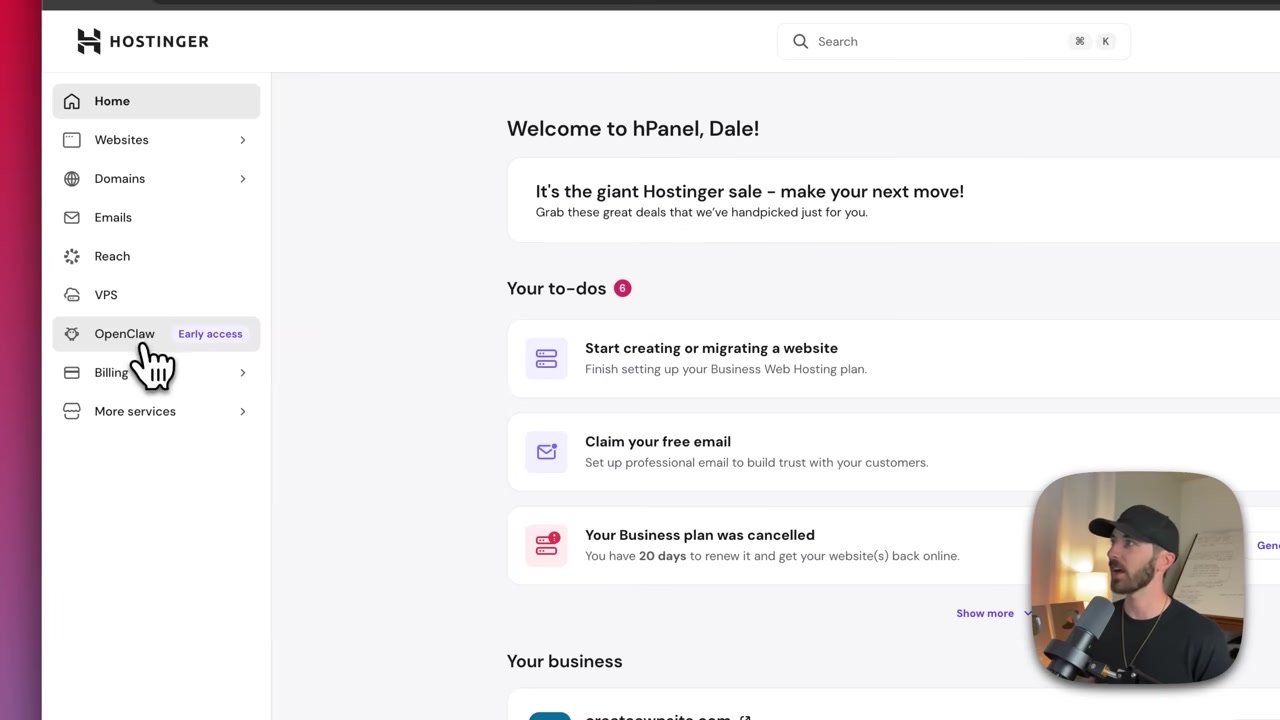
If you follow the video route, choose the managed OpenClaw application during VPS setup, finish the account configuration, and open the OpenClaw panel from the Hostinger dashboard. You do not need to paste terminal commands just to get the first assistant online.
The managed setup keeps the first install inside the hosting panel. Confirm the OpenClaw application is present before moving to channels or skills.
Step 2: install OpenClaw manually, if you prefer
On macOS or Linux, OpenClaw's official installer is:
curl -fsSL https://openclaw.ai/install.sh | bashOn Windows PowerShell, the official command is:
iwr -useb https://openclaw.ai/install.ps1 | iexInstall scripts are convenient, but they also run code on your machine. Read the official getting-started page, confirm the domain, and avoid copying an installer from a forum post or video description.
After the install finishes, run openclaw --version. If your terminal can't find the command, close and reopen the terminal so it reloads your PATH.
Step 3: run the onboarding wizard
Start the guided setup with:
openclaw onboard --install-daemonThe wizard walks you through model authentication, Gateway configuration, workspace setup, and optional channels. For your first run, keep the setup boring. Choose one model provider, use the local Gateway, and skip optional integrations you don't need yet.
The daemon matters. It keeps the Gateway available after you close the terminal. If you only run the Gateway in a foreground window, your assistant disappears the moment that process stops.
Step 4: verify the Gateway
The Gateway is the always-on process that routes messages, model calls, sessions, and tool requests. Check it with:
openclaw gateway statusYou should see the Gateway listening on port 18789. If it isn't running, try openclaw gateway restart, then check the status again. The official Gateway runbook also recommends openclaw gateway status --require-rpc when you want to confirm that the service is responding, not merely occupying a port.
Step 5: connect Telegram and send one message
Run openclaw dashboard for a local installation, or open the managed panel on your VPS. The browser dashboard is the easiest place to confirm that the model and Gateway work before adding another channel.
In Telegram, search for BotFather, create a new bot, give it a name and username, and copy the bot token into OpenClaw's Telegram integration. Treat that token like a password. Once OpenClaw confirms the connection, send the bot a simple hello and tell it your time zone. The time-zone detail matters later when you create calendar events and scheduled jobs.
A ping-and-pong check is deliberately boring. That is why it works: it proves the channel and Gateway can talk before a real task adds more variables.
Send a harmless prompt first: ask the assistant to explain what tools it can access, summarize a text file in a test folder, or create a checklist without writing anything. If the response arrives, your model credentials and Gateway are working.
Don't start with “organize my whole computer.” A broad request makes it hard to tell whether the assistant understood the job, touched the wrong files, or simply stopped halfway through. Give it a narrow folder and a result you can inspect.
Step 6: create a private workspace
OpenClaw keeps its configuration and workspace outside the application code. The recommended locations are ~/.openclaw/openclaw.json for configuration and ~/.openclaw/workspace/ for skills, prompts, and memory.
That separation is useful. You can update OpenClaw without mixing your private instructions into the software repository. Treat the workspace like a private operations folder: don't publish it to a public GitHub repository, and don't paste API keys into a skill file.
Step 7: secure the assistant before adding more access
An OpenClaw assistant can become far more powerful than a normal chat window. Depending on your tool policy, it may read files, run commands, send messages, or schedule work. That means the security setup is part of the tutorial, not an advanced extra.
- Keep the Gateway local. Don't expose port 18789 to the public internet just to make setup easier.
- Use allowlists and pairing. Only approved senders should be able to trigger the assistant.
- Start with limited tools. Give read access before write access, and add command execution only when a real workflow needs it.
- Run the security audit. Use
openclaw security audit --deepafter configuration changes. - Separate trust boundaries. Don't share one tool-enabled Gateway with people who shouldn't share its authority.
OpenClaw's own security documentation describes it as a single-user personal-assistant trust model. If you need multiple untrusted users, give them separate gateways and preferably separate operating-system users.
Step 8: install one skill safely
Skills expand what OpenClaw can do. In the video, I use the Google Workspace skill from ClawHub so the assistant can work with Calendar and Drive. Search the library, open the skill page, read what it installs and which permissions it requests, then ask OpenClaw to install that specific skill.
Do not treat a popular skill as automatically safe. A skill is still code and instructions written by somebody else. Review its source, avoid anything that asks for unrelated access, and start with a test account when possible.
Step 9: connect Google Workspace
The Google setup is the most technical part of the video, but it is a one-time job. Create a project in Google Cloud, enable only the APIs you plan to use, configure the OAuth consent screen, add your own account as a test user, and create a desktop OAuth client. Download the credentials file and give it to OpenClaw through the setup flow.
OpenClaw names the Google setup it needs before Dale opens Cloud Console. Keep the permission list narrow and review every requested scope.
Start with Calendar and Drive. Add Gmail later, after the read-only workflow behaves the way you expect. Email access creates a much bigger risk surface because an agent can encounter malicious or misleading instructions inside messages.
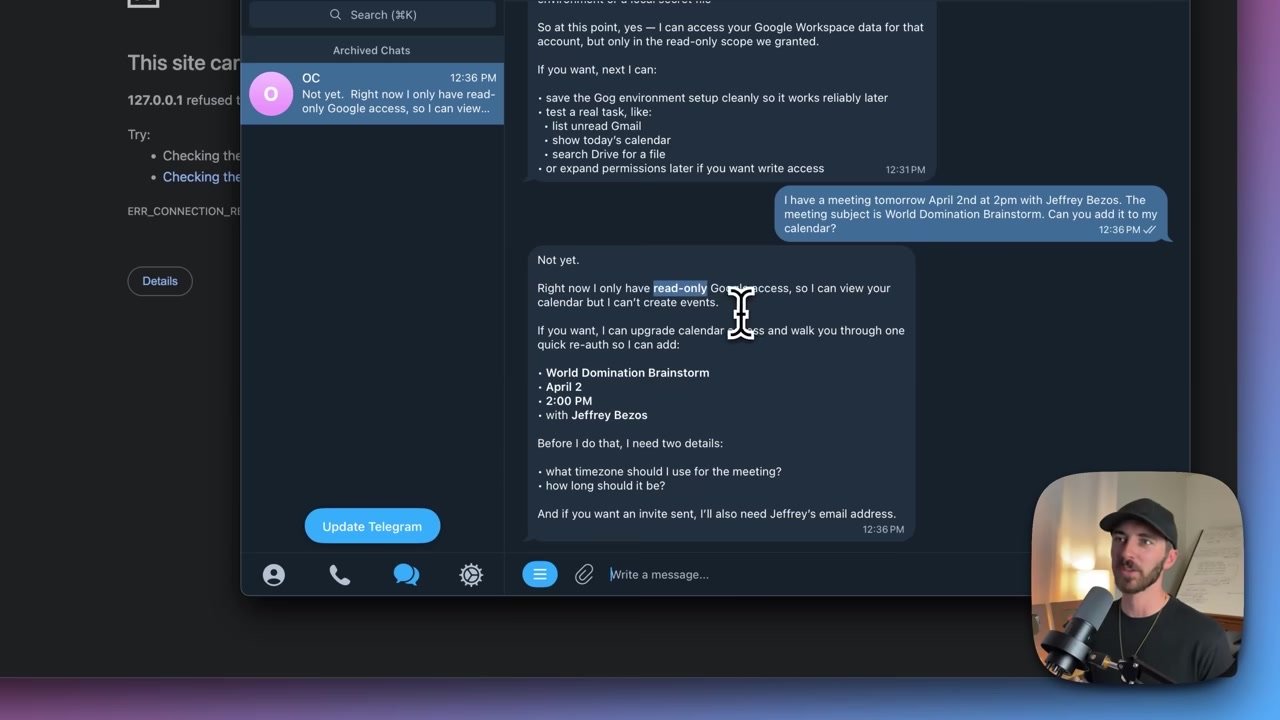
For the first real test, I ask the assistant to create a calendar event. It asks for the missing time-zone detail, opens the Google authorization flow, and then returns the event link so I can verify the result. That is exactly the kind of first task you want: useful, narrow, and easy to check.
Step 10: choose cron jobs or heartbeats
A cron job runs at a specific time, such as sending a morning brief every day at 9:00 a.m. A heartbeat checks repeatedly, such as watching a product page and notifying you when the price changes. Pick the mechanism that matches the trigger instead of forcing every automation onto a calendar.
In the tutorial, I create a webpage monitor and temporarily change the page so we can see whether OpenClaw detects it. The notification arrives in Telegram, which proves the full loop works: scheduled check, webpage access, comparison, and message delivery.
The alert is the proof step. OpenClaw checks the page again, detects the changed price, and returns a link in Telegram that Dale can inspect.
If the assistant becomes confused after a bad setup, restart OpenClaw from the hosting panel or run openclaw gateway restart locally. If a test agent has accumulated messy instructions or permissions, it can be faster and safer to delete that test instance and start fresh than to keep layering fixes onto it.
Before calling the setup finished, run one complete test from your phone. Send the Telegram request, watch the assistant use the approved tool, open the returned calendar event or webpage result, and confirm the time zone and details yourself. Then close the browser dashboard and repeat the request. That second test proves the Gateway is genuinely running in the background instead of surviving only because you left a setup window open.
Step 11: connect one chat channel
Once the browser chat works, connect the channel you already use every day. OpenClaw supports options including iMessage, Telegram, Discord, Slack, WhatsApp, Signal, Google Chat, and Microsoft Teams, though installation and feature support vary by channel.
Use openclaw channels add or the channel flow inside openclaw configure. Pair your own account, test a direct message, then confirm that an unapproved sender cannot activate the assistant.
Don't connect five channels because the list looks exciting. One dependable doorway is better than five half-configured ones.
Step 12: give OpenClaw its first useful job
A good first workflow has a clear trigger, a small set of inputs, and an output you can verify in under a minute. Try one of these:
- Morning brief: summarize today's calendar and open tasks without changing either one.
- Research folder: read a folder of saved articles and produce a source-linked outline.
- Draft helper: turn one approved outline into a draft, then stop for review.
- Website check: visit a list of pages and report broken links without editing the site.
Our guide to OpenClaw prompts will help you turn that job into a repeatable instruction. Start with a small, practical use case before adding more tools.
Once that works, tune how the assistant communicates before giving it more tools. In the video, I update the operating instructions so the assistant stays practical, gives clear steps, questions assumptions, and focuses on helping the user make progress quickly. A well-instructed assistant with three safe tools is more useful than a vague assistant with access to everything.
Also decide which model should handle which work. Use a lower-cost model for repetitive monitoring, formatting, and simple lookups. Reserve the strongest model for planning, ambiguous research, or decisions where better reasoning changes the result. OpenClaw can route work between models, which keeps a frequent heartbeat from burning premium-model credits all day.
Common OpenClaw setup problems
| Problem | What to check first | Next move |
|---|---|---|
| Command not found | Terminal PATH and Node version | Reopen the terminal and rerun the installer |
| Gateway won't start | gateway.mode and port 18789 | Run status, doctor, then restart |
| Dashboard opens but no reply | Model provider authentication | Re-run the model-auth section of configure |
| Channel messages fail | Pairing, allowlist, and channel status | Use openclaw channels status --probe |
| Assistant has too much access | Tool allow/deny policy | Remove tools, then run the security audit |
Use the table as a triage order: confirm the runtime, then the Gateway, then the model connection. Only after those pass should you troubleshoot channels or permissions.
Frequently Asked Questions
Is OpenClaw beginner-friendly?
The guided installer makes the first chat fairly quick, but OpenClaw is still a self-hosted tool with real permissions. A beginner can use it if they're comfortable following terminal instructions and testing carefully. If the words port, daemon, and API key are completely new, take the setup one step at a time.
Can I use OpenClaw without a chat app?
Yes. The browser-based Control UI is enough to run the assistant, and it's the best place to test a fresh installation. Add Telegram, Slack, WhatsApp, or another channel only after the dashboard works.
Does OpenClaw need to run all the time?
The Gateway must be running whenever you want the assistant to receive messages or execute scheduled work. Installing it as a daemon keeps it available in the background. For a 24/7 assistant, use a machine or server that stays online.
Is OpenClaw safe?
It can be safe inside a carefully configured single-user trust boundary. Risk increases when you expose the Gateway, accept messages from unknown senders, install untrusted plugins, or grant broad command access. Use allowlists, limited tools, and the built-in security audit.
Can OpenClaw run locally?
Yes. The Gateway can run locally on your own computer, while the model may still be called through an external provider. Local Gateway does not automatically mean every piece of data processing happens offline.
What should I build first?
Build a read-only daily brief or research summary. Both are useful, easy to inspect, and unlikely to damage anything. Add writes, messages, and command execution only after the read-only version behaves consistently.
Start small, then earn more access
Your first OpenClaw setup doesn't need ten channels and thirty tools. Install the Gateway, get one browser chat working, secure it, and prove one small workflow. Once that survives a week of real use, you'll know exactly which capability deserves to come next.
If the setup feels heavier than the result you want, compare our OpenClaw use cases, OpenClaw alternatives, and OpenClaw pricing guide before committing. The right tool is the one you can operate safely and keep running, not the one with the longest feature list.