Google Analytics can tell you which pages bring people in, where those visitors came from, what devices they use, and whether they complete the actions your website was built to earn.
The installation should be the easy part. The old version of this tutorial used Universal Analytics, access codes, and a plugin that no longer matches the current system. Today, I recommend connecting Google Analytics 4 through Site Kit by Google.
Quick answer: add Google Analytics with Site Kit
Install the official Site Kit by Google plugin, connect the Google account that should own or access the property, select the correct GA4 web data stream, let Site Kit place the tag once, and verify it with Tag Assistant plus the Realtime report.
That path avoids theme-file editing and gives you a useful reporting summary inside WordPress. Use a manual tag or Google Tag Manager only when the website has a real technical reason for it.
Use an account the website owner controls. If an agency or freelancer sets this up, the business should own the Analytics property and grant individual access. Do not build the measurement history inside an account that disappears when the relationship ends.
Google's current Site Kit overview below shows the plugin, dashboard, Search Console connection, and the kinds of decisions the combined data can support.
The written steps below focus on the Analytics setup itself, including the checks that keep a successful-looking installation from sending bad data.
Choose one installation method
A Google tag can reach WordPress through several paths. The right choice depends on who will maintain it and how complicated the measurement plan is.
| Start here Site Kit | Manual tag | Tag Manager | |
|---|---|---|---|
| Code required | No | Yes | Some setup |
| WordPress dashboard reports | Yes | No | No |
| Best for | Most WordPress sites | A controlled custom build | Advanced tags and events |
| Main responsibility | Connect the correct property | Maintain code through theme changes | Manage containers, triggers, and publishing |
| Setup risk | Connecting the wrong Google account | Losing or duplicating the snippet | Publishing an incorrect trigger |
Swipe to compare more options. Site Kit stays pinned.
Use one placement method. Two plugins or snippets sending the same GA4 measurement ID can duplicate page views and make the reports unreliable.
I recommend Site Kit for a normal business site, portfolio, blog, or beginner WooCommerce project. If your WordPress foundation still needs work, complete the WordPress tutorial before adding reporting tools.
Recommended method
Site Kit by Google
Why I use it for beginners
- Official Google plugin Google maintains the connection flow for Analytics, Search Console, PageSpeed Insights, and other supported services.
- No theme-file editing Site Kit can place the Google tag without asking you to paste code into header.php or rebuild it after a theme change.
- Useful WordPress summaries The dashboard gives you a quick view of visitors, content, Search Console, and page-level performance before you open the full tools.
What it does not replace
- Consent still needs a real setup Turning on Analytics does not write your privacy policy or replace the consent banner and regional settings your site may require.
- Advanced events need planning A complex funnel, custom application, or unusual checkout may still need Tag Manager, developer work, or a dedicated integration.
- The full reports live in Analytics Site Kit is a useful summary. Detailed acquisition, event, audience, and exploration work still belongs in Google Analytics.
Site Kit wins the first setup because it keeps ownership, placement, and basic reporting visible. That does not make every advanced tracking job automatic.
Before you connect Analytics
Five minutes of preparation prevents the most common mistakes. Gather the right access before opening the setup flow.
- A public production website. Site Kit needs a site that Google can reach. Do not connect a password-protected staging copy as if it were the live website.
- A WordPress administrator account. You need permission to install and configure the plugin.
- The correct Google account. Use the account that owns the existing Analytics property or should own the new one.
- The website's final HTTPS address. Confirm whether the canonical version uses www or no www.
- A privacy and consent plan. Decide who is responsible for the privacy policy, consent banner, regional behavior, and ongoing review.
Run a backup before changing plugins on an important site. Our WordPress backup guide covers the full process and how to confirm that the backup can be restored.
Step 1: install Site Kit by Google
In WordPress, open Plugins → Add New and search for Site Kit by Google. Confirm that Google is listed as the author, then select Install Now and Activate.
This official Google animation shows the exact plugin-directory path. The WordPress styling may change, but the plugin name and install flow are the parts that matter.
Site Kit can connect Analytics, Search Console, PageSpeed Insights, and other supported Google services. Keep the plugin stack intentional. The best WordPress plugins guide explains why overlapping tools create more maintenance than value.
Step 2: connect the correct Google account
Open Site Kit → Dashboard. Select the option to connect Google Analytics during setup, then choose Sign in with Google.
Read each permission screen. Site Kit uses those permissions to verify ownership and display private metrics inside WordPress. If the account does not have access to the right property, stop and switch accounts instead of creating a duplicate property by accident.
Here is the ownership and Google service connection stage. Site Kit checks that the site belongs to you before it exposes account data.
Finish the Search Console step as well. Search Console explains how the site appears in Google Search; Analytics explains what visitors do after they arrive. You want both views.
Step 3: select or create the GA4 property
Site Kit now asks for an Analytics account, property, and web data stream. Think of them as three levels:
| Level | What it represents | What to check |
|---|---|---|
| Account | The organization that owns Analytics | Use the business or website owner's account |
| Property | The website or app being measured | Select the property created for this project |
| Web data stream | The website sending events into the property | Confirm the exact HTTPS domain |
| Measurement ID | The identifier used by the Google tag | GA4 web IDs begin with G- |
If the website already has GA4 history, connect the existing property and stream. If this is a new site, Site Kit can create them. Name the account and property clearly enough that the next administrator knows what they belong to.
Do not create a second property to fix an access problem. Get the correct owner to grant access. A duplicate property splits the history and makes every future report harder to trust.
Step 4: let Site Kit place the Google tag once
After you select the property and web data stream, complete the Analytics setup. Site Kit can place the Google tag across the website without editing header.php.
Open Site Kit → Settings → Connected Services → Analytics and confirm the account, property, and web data stream. Leave Place Google Analytics code enabled when Site Kit is the only installation method.
If another plugin, theme setting, host integration, manual snippet, or Tag Manager container already installs the same measurement ID, choose one owner for the tag and remove the duplicate path.
One page view should be sent once. Installing the same GA4 tag through Site Kit and another tool can inflate page views, sessions, and events. Check the existing site before adding another snippet.
Site Kit excludes logged-in users from Analytics by default. That keeps your own editing sessions out of the reports, but it also means testing while logged into WordPress can look like a failed installation.
Step 5: enable the useful GA4 settings
The default tag collects page views and core session information. Site Kit can also enable enhanced measurement for supported interactions such as scrolls, outbound clicks, file downloads, site search, and video engagement.
Turn on the interactions that fit the website. More events do not automatically create better decisions. Start with the actions tied to the site's job.
| Website type | First actions to measure | Why they matter |
|---|---|---|
| Business | Qualified form submissions, calls, bookings | Shows which pages create leads |
| Portfolio | Project views, inquiry starts, downloads | Shows which work earns deeper interest |
| Blog | Landing pages, scrolls, email signups | Shows which topics attract and retain readers |
| Store | Product views, add to cart, checkout, purchase | Shows where the buying path loses people |
A measurement plan should match the build. The business website guide centers the lead path, so its reports should center qualified inquiries instead of raw page views.
For a publication, the blog guide centers useful content and repeatable audience growth. That makes landing pages, topic groups, scroll depth, and email signups more useful than one sitewide traffic number.
Step 6: configure consent and privacy
Analytics installation does not settle the privacy requirements for your site. The correct notice, consent behavior, regional defaults, and retention choices depend on where the site operates and where its visitors live.
Site Kit includes a consent mode setting under Site Kit → Settings → Admin Settings. Google explains that consent mode still needs the WP Consent API plus a compatible consent-management plugin so visitors can make a real choice. Read the official Site Kit consent mode guide and get legal guidance for the regions you serve.
A banner that only says “we use cookies” is not the same as a working consent system. Test what the tags do before consent, after acceptance, and after denial. Document the result.
Treat privacy plugins like the rest of the security stack: keep them updated, limit administrator access, and test after changes. The website security guide gives you the wider maintenance plan.
Step 7: verify that Analytics is collecting data
Do not finish at the green confirmation screen. A connection can look complete while the wrong property is selected, the tag is duplicated, consent blocks the test, or a cache serves an older page.
- Open a private browser window. Visit the live site while logged out of WordPress and follow the consent choice you intend to test.
- Check Google Tag Assistant. Enter the website address and confirm the expected G- measurement ID appears and sends events. Google provides the current process in its tag-verification guide.
- Open the GA4 Realtime report. Move through two or three pages and look for your device, page views, and events.
- Check again later. Realtime can confirm the connection quickly, while standard reports can take longer to populate.
A brand-new connection may show a gathering-data state inside Site Kit. That is normal while standard reporting catches up.
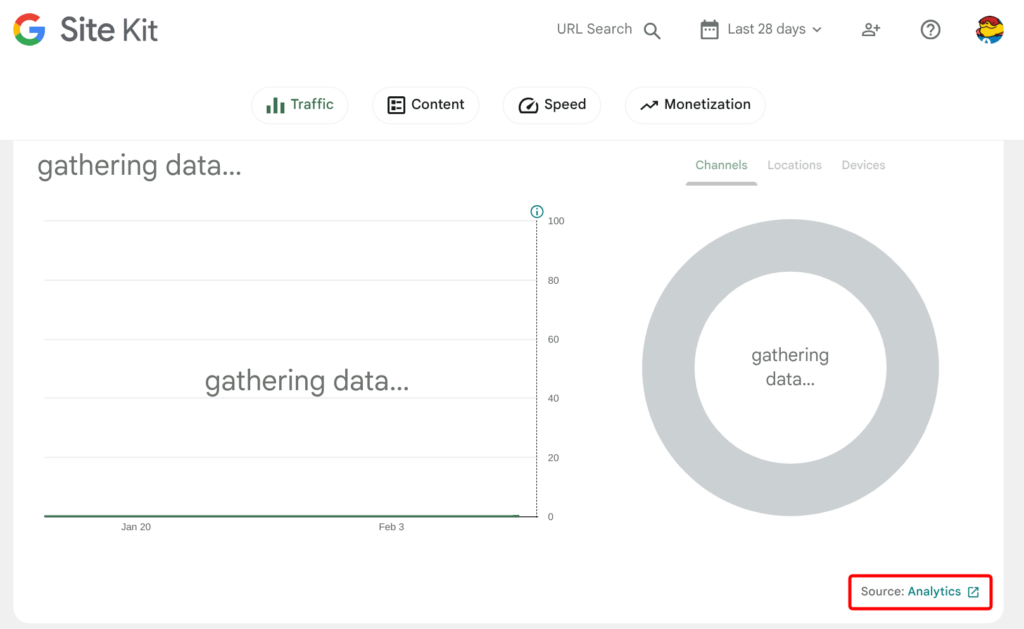
If Realtime and Tag Assistant both show the correct events, give the normal reports time. If neither one sees the tag, troubleshoot the installation instead of waiting.
Troubleshoot the common setup problems
| Problem | Likely cause | What to check |
|---|---|---|
| No visit in Realtime | Logged-in exclusion, consent denial, blocker, or missing tag | Test logged out, check consent, then use Tag Assistant |
| Numbers look too high | The same measurement ID fires more than once | Audit Site Kit, other plugins, theme code, and Tag Manager |
| Wrong website data | Incorrect property or web data stream | Match the domain and G- measurement ID in Site Kit and GA4 |
| Dashboard says gathering data | New connection or report-processing delay | Confirm Realtime first, then allow standard reports to populate |
| Setup loops or fails | REST API, site URL, plugin conflict, or blocked connection | Check Site Health, canonical URL, caching, and Site Kit troubleshooting |
Caching should not be the first thing you blame, but clear the relevant cache after changing a sitewide tag. If the whole site feels slow or unstable, work through the WordPress speed guide instead of piling on more tracking plugins.
What to look at after the setup
Site Kit gives you a useful snapshot in WordPress. Use it to notice changes, then open Analytics or Search Console when the question needs a real report.
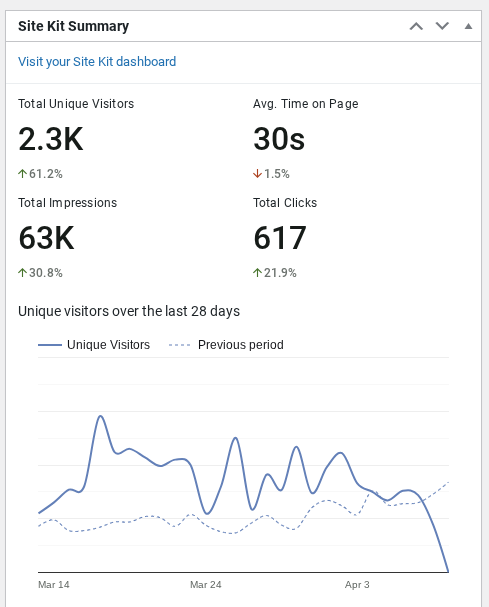
Start with a small weekly review. Which landing pages brought in useful visitors? Which traffic sources sent them? Which pages led to the primary action? Did a technical or content change alter the pattern?
- Traffic acquisition: where sessions came from, grouped by channel or source.
- Landing pages: which pages started the visit and whether those visits led anywhere useful.
- Events and key events: the actions connected to leads, signups, purchases, or other real outcomes.
- Devices: whether mobile and desktop visitors behave differently enough to justify a design or performance fix.
- Search Console: which Google queries and pages earned impressions and clicks before the visitor reached the site.
Do not celebrate a traffic increase until you know what caused it and whether those visitors did anything useful. Analytics is a decision tool, not a scoreboard.
A portfolio should connect project views to real inquiries, which is why the portfolio website guide builds the work and contact paths together.
A store needs the complete buying sequence. Use the online store guide to build and test the product, cart, checkout, payment, and order flow before you trust the purchase reporting.
Google Analytics for WordPress FAQs
Frequently Asked Questions
What is the easiest way to add Google Analytics to WordPress?
For most WordPress sites, install Site Kit by Google and connect Analytics during setup. It can create or connect a GA4 property, place the Google tag, and show a useful summary inside WordPress without editing theme files.
Is Site Kit by Google free?
Yes. Site Kit is a free, open-source WordPress plugin maintained by Google. Google Analytics also has a standard free product. Other services you connect through Site Kit can have their own terms or fees.
Do I need a Google Analytics account before installing Site Kit?
No. Site Kit can help create a new Analytics account, property, and web data stream during setup. If you already have them, use the Google account with access and select the existing property that belongs to this website.
Where do I find my GA4 measurement ID?
A GA4 web measurement ID begins with G-. In Analytics, open Admin, choose the correct property, open Data Streams, select the web stream, and read the Measurement ID. Site Kit shows the connected account, property, and web data stream under Site Kit, Settings, Connected Services, Analytics.
How do I know Google Analytics is working on WordPress?
Open your site in a private window, use Google Tag Assistant to confirm that the Google tag appears and sends events, then check the Realtime report in Analytics. Standard reports can take longer to populate, so do not use an empty report immediately after setup as proof that the tag failed.
Why is Google Analytics not showing my visit?
Site Kit excludes logged-in users by default, and a browser extension, consent choice, cache, duplicate tag, wrong property, or new-property delay can change what you see. Test in a private window while logged out, accept the consent choice used for the test, verify the tag with Tag Assistant, and confirm the connected measurement ID.
Should I use Site Kit or Google Tag Manager?
Use Site Kit when you need a clean GA4 installation and basic Google service reporting. Use Tag Manager when you have a written measurement plan for multiple tags, custom events, or complex triggers and someone who will maintain the container. Do not add both just because they are available.
Does adding Google Analytics make my WordPress site compliant with privacy laws?
No. Analytics installation and privacy compliance are separate jobs. Your notice, consent mechanism, data choices, retention, and regional obligations depend on where the site and its visitors are located. Site Kit supports consent mode, but you still need a compatible consent setup and appropriate legal guidance.
Install it once, then measure what matters
For most WordPress sites, Site Kit is the cleanest route into GA4. Connect the owner-controlled account, select the correct property and web data stream, place the tag through one tool, configure consent, and verify the result while logged out.
Then stop watching every number. Pick the few actions tied to the website's job and use those reports to decide what to improve next.