You are building
How to Start a Blog (2026)
Learn the foundations first. Then follow the steps at your own pace.
Starting a blog sounds easy until you start Googling how to actually do it. Suddenly you’re comparing platforms, reading about domains and hosting, and wondering if you even need your own website…or if publishing on Medium or Substack would work just as well.
In this guide we'll cover how to build a real WordPress blog on your own domain, from scratch, in one sitting. No developer, no technical background. Just the full setup process in order, with nothing skipped.
The niche doesn’t matter. Whether you’re starting a travel blog, a food blog, a personal finance site, or a professional portfolio, the technical setup is identical. We'll cover everything from writing your first SEO-optimized post to building an email list and eventually making money from the site.
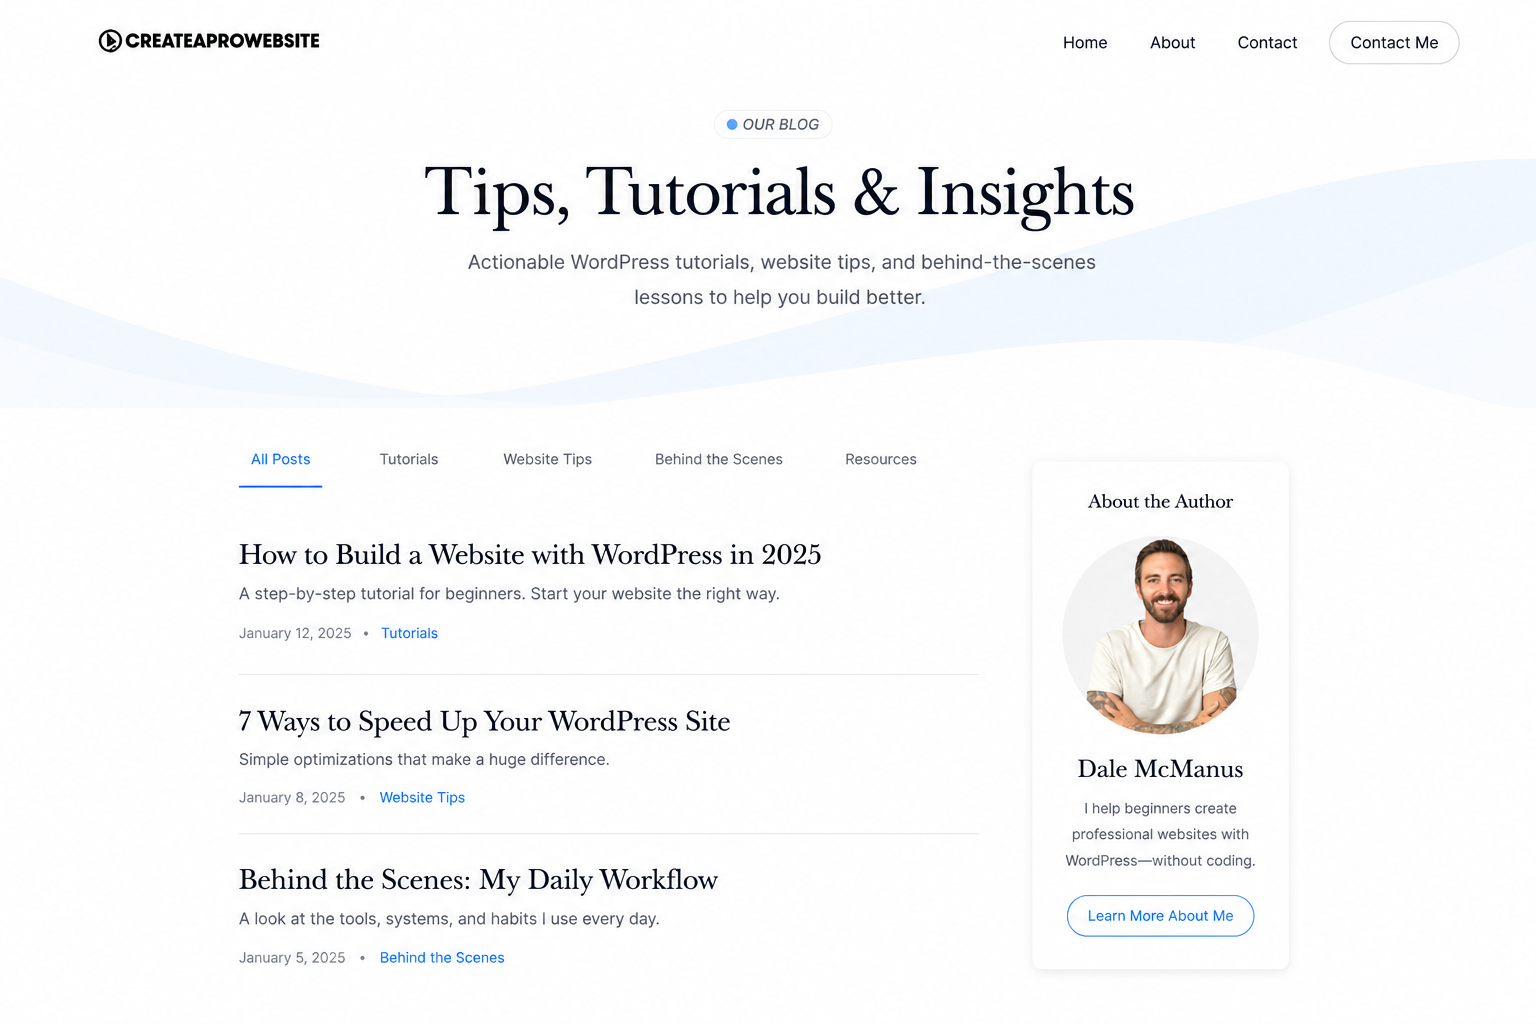
Here’s what the finished blog looks like:
Pick Your Platform: WordPress
Why WordPress beats Medium and Substack
Every blog needs a platform. This is the software it runs on. Your choice determines where your content lives, who owns your traffic, and what it costs you long-term.
Medium, Substack, and LinkedIn are fine places to publish. But the SEO value from every article you write goes to their domain, not yours. When your post ranks on Medium, it makes Medium more valuable instead of you.
A WordPress blog on your own domain reverses that. Every search click goes to yoursite.com. Every subscriber is yours to email for life. Every monetization dollar flows through you instead of a platform taking 10% of your email list or restricting what you can promote.
| Our pick WordPress | Medium | Substack | Ghost | ||
|---|---|---|---|---|---|
| Overall rating | |||||
| Setup effort | Easy (via host) | Instant | Instant | Easy | Instant |
| SEO ownership | Full — yoursite.com | Goes to medium.com | Goes to substack.com | Full ownership | Goes to linkedin.com |
| Monetization control | Unlimited | Partner program only | Paid subs (10% cut) | Paid memberships | None |
| Email list ownership | Full ownership | Not yours | Partial | Full ownership | Not yours |
| Custom domain | Yes | Paid plan only | Yes (paid) | Yes | No |
| Pricing model | ~$4/month hosting | Free (rev share) | Free + 10% of revenue | $9–25/month | Free |
| Best fit | Long-term growth | Content discovery | Newsletter community | Paid newsletters | Professional network |
Swipe to compare more options. WordPress stays pinned.
Ranking emphasizes SEO ownership, monetization control, and long-term audience portability.
Which Platform Is Right for You?
- Self-hosted WordPress: your domain, your SEO, full monetization. ~$3/month hosting. This guide.
- Medium: SEO goes to medium.com. Partner program only. Hard to leave.
- Substack: grows on substack.com. Takes 10% of paid subscriber revenue at scale.
- LinkedIn articles: no SEO benefit. Posts disappear from reach within 48 hours.
The sooner your domain has indexed content, the sooner Google begins building trust in it. A live blog with two solid articles beats a “coming soon” page with a perfect design every single time.
Sign Up for Hosting and Register Your Domain
Your blog needs a home
A self-hosted WordPress blog needs two things: a domain (your permanent address on the internet such as yourblog.com) and hosting (the server where your site and all of your posts live). These two things together are what separate a real blog from a profile on someone else's platform.
Go to Hostinger via our discount link so the coupon applies automatically at checkout. On WordPress.org, click Hosting in the menu and you'll see WordPress's official list of recommended providers. You'll find Hostinger on that list, and that's why I use it for every blog I build.
Back on Hostinger, choose the Business plan. This costs about $3–4/month with a free domain for year one and a CDN that keeps page load times fast as your post library grows. Set a 12-month billing cycle for the best rate, then complete checkout.
Your domain registration happens in Step 2, not in the plan checkout search bar.
Think long-term before choosing your domain. “SevillaFoodGuide.com” locks you into one city and one topic. A name based on a brand you plan to build, or your own name, gives you room to expand topics and geographies over time without changing your URL and losing SEO value.
Register Your Domain and Install WordPress
Your address and dashboard
After checkout, Hostinger's setup wizard starts automatically. Click Create a website, select WordPress, and create your admin username and password. Write these down somewhere safe, or use a password manager to store it.
Choose Create a blank site when prompted. We import a clean blog template in the next step, so there is no need for a pre-built AI layout here.
Now register your free domain. Choose something readable and memorable such as your brand name, your name, or a niche phrase that gives you room to grow. Type the name, confirm it is available, and finish registration.
Hostinger installs WordPress in about 60 seconds. Once it finishes, click Go to Admin Panel or navigate to yourdomain.com/wp-admin. This is your WordPress dashboard, and it's the control center for your entire blog. Bookmark this URL.
The left sidebar gives you access to everything: Pages, Posts, Plugins, Appearance, and Settings. Hover over each section to get oriented before you start building.
Install Astra and Import a Blog Template
A layout ready for writing
Go to Appearance → Themes, search for Astra, install it, and click Activate. Astra is one of the most widely used free WordPress themes — fast, clean, and built to work with the Starter Templates library.
Now open Appearance → Starter Templates. If it does not appear, install it as a plugin under Plugins → Add New first. In Starter Templates, click the back arrow if prompted and select Elementor as your page builder before browsing templates.
Filter templates by Blog and pick a clean, reading-focused layout. Blog templates emphasize typography, post grids, and clear navigation over heavy visual design. Click Submit and build my site.
Astra installs your homepage, About page, and blog post template automatically. All the structural pieces are in place before you write a single word.
Understand Posts, Pages, Categories, and Permalinks
How WordPress organizes content
WordPress has two content types that trip up almost every new blogger. Getting this right from day one saves a significant amount of cleanup later.
- Pages: static content that rarely changes: Home, About, Contact. Created once and maintained over time.
- Posts: your actual blog articles. Published over time, organized by date and category, indexed by Google as they accumulate.
Create 3–5 broad categories before writing your first post. Think buckets, not specific topics — “Recipes,” “Travel Tips,” “Budget Guides.” Tags are optional, fine-grained labels. Do not create hundreds of them on day one.
Then set your permalink structure. Go to Settings → Permalinks → Post name so your URLs read as yoursite.com/post-title instead of ?p=123. This one setting matters for SEO and takes 30 seconds to do. Do it before publishing anything.
Anatomy of a Blog Post That Ranks
What makes posts useful
Every high-performing blog post shares the same structure. Learn this pattern and every post you write becomes easier to draft. It also makes your posts easier for Google to understand.
- Title (H1): includes the phrase someone would actually search; specific beats clever
- Introduction: state the problem and promise the answer in the first 100 words
- H2 subheadings: break the post into scannable sections; each heading answers a sub-question
- Images: at least one every 300–400 words; compress before uploading
- Internal links: link to other relevant posts with natural anchor text
- Conclusion with a next step: summarize and point somewhere useful
Readable typography makes long posts actually readable. In Elementor, bump body font size to 17–18px and add generous vertical padding between sections. Blog readers scan on phones making short paragraphs and visible subheadings matter more than elegant prose.
Adjust section padding to give your content room to breathe. The Advanced → Padding controls in Elementor let you unlink top and bottom values so you can fine-tune vertical spacing without affecting margins.
Before you write or publish a post, search your target phrase in Google and read the top 3 results. Your post should answer the same question better. Think more specific examples, clearer steps, or more current information. Matching and beating search intent is the single biggest SEO lever available to a new blog.
Blog SEO Basics
The basics Google looks for
You don’t need to become an SEO expert on day one. Install one plugin such as Rank Math (free) or Yoast SEO (free), and master three fundamentals for every post you publish.
- Focus keyword: one phrase per post, set in the SEO plugin field below the editor. This tells the plugin what to audit your post against before you hit publish.
- Title tag and meta description: write these in the SEO plugin panel below your post. Your title should include the target keyword. Your meta description gives the person scanning search results a specific reason to click your result over the others on the page.
- Google Search Console: submit your sitemap (usually yoursite.com/sitemap.xml, auto-generated by Rank Math) at search.google.com/search-console. It’s free, takes 10 minutes, and tells Google your posts exist so they get indexed and tracked.
Set up Google Search Console the same day your blog goes live and submit your sitemap. New sites with no submitted sitemap are invisible to Google until they are discovered through links or crawling. This can take months. Submitting takes 10 minutes and starts the clock immediately.
Build Your Email List From Day One
Bring readers back later
Email is the most valuable asset a blogger can build. A subscriber list survives every algorithm change, platform shutdown, and Google update. Social media reach is borrowed. Your email list is owned.
Start with a simple opt-in form on your blog sidebar and at the bottom of every post: “Get new posts in your inbox.” You do not need a complex lead magnet on day one. The ask is simple — useful content, delivered to their inbox when you publish.
Free email tools that work well for bloggers starting out: Mailchimp (free up to 500 subscribers), Kit (free up to 1,000 subscribers), and Brevo (free with generous send limits). Connect any of these to a WPForms opt-in on your site.
Even 100 engaged email subscribers is worth more than 10,000 passive social followers. Subscribers chose to hear from you. They open emails. They share posts. They buy things when you recommend them. Start building from your very first published post.
How to Make Money Blogging
Simple paths to revenue
Blogging income is real, but it' i's not instant. Different monetization methods make sense at different stages of your traffic.
Most bloggers start with one method and layer others as traffic grows. Here's a realistic path with what each option actually requires:
| Method | When it makes sense | Typical timeline to first $ | Effort level |
|---|---|---|---|
| Display ads (AdSense) | 1,000+ monthly pageviews | 2–4 months after launch | Low. Install plugin, wait for approval |
| Affiliate marketing | Readers trust your recommendations | 3–6 months with consistent posts | Medium. Needs genuine audience first |
| Sponsored posts | 10k+ monthly visitors or a tight niche | 6–12 months | Relationship-based |
| Digital products | Clear problem you can solve for readers | Varies. Often highest margins long-term | High upfront creation |
Google AdSense is the fastest path to first earnings for a new blog. Sign up at adsense.google.com, get site approval (usually 2–4 weeks for a new blog with a few articles), paste the site code snippet into WordPress, and ads appear automatically across your posts.
Affiliate marketing works well for travel blogs (hotels, booking.com), food blogs (kitchen tools, meal kits), and any niche where you naturally recommend products. Sign up for Amazon Associates or individual brand affiliate programs, add honest recommendation posts, and earn a commission when readers buy through your link.
Long-term, affiliate commissions and digital products outperform ad revenue at any traffic level. Ads fund the early months while you build. Most bloggers with sustainable, full-time income combine two or three streams instead of just one.
Mobile Reading Check and Launch
Make reading easy everywhere
Over 60% of blog traffic arrives from phones. Readers scan on small screens. This is why short paragraphs, visible subheadings, and a comfortable font size matter more than any design flourish. In Elementor's mobile view, check that heading sizes scale down cleanly, paragraph spacing stays comfortable, and any sidebar content stacks below the post body rather than squeezing beside it.
Then, test on a real phone, and not just a browser resize. Open your homepage, open a post, scroll through it, and tap the email opt-in form. The mobile reading experience is where most blog templates cut corners, and it is what most of your readers will actually see.
Use this blog launch checklist:
- Permalinks set to Post name under Settings → Permalinks (do this before your first post)
- 3–5 categories created and organized
- First 2–3 posts published and live, and not just sitting in draft
- Rank Math or Yoast installed, sitemap submitted to Google Search Console
- About page explains who you are and what the blog covers
- Email opt-in form live on at least the homepage and one post
- Mobile reading tested on a real phone
Don't wait until you have 10 posts to launch. The sooner your domain has live, indexed content, the sooner Google starts building trust in it. Three solid posts on launch day beats zero posts behind a perfect homepage every time.
Frequently Asked Questions
How much does it cost to start a blog?
About $3–4/month for Hostinger hosting, plus a free domain in year one. WordPress, Astra, Elementor, and Rank Math are all free. Total first-year cost under $60. This fee is far less than paid newsletter platforms once you factor in subscriber fees and revenue splits at scale. Substack takes 10% of your subscriber revenue. Hosting is a flat fee regardless of how large you grow.
Can I start a blog for free?
WordPress.com free tier, Medium, and Substack are technically free. But you get a subdomain, no control over SEO, restricted monetization, limited plugin access, and zero ownership of the platform. A self-hosted WordPress blog on $3/month hosting is the right balance of cost and control for anyone serious about building an audience or income. The monthly cost is less than a coffee, and the difference in what you own is enormous.
How do bloggers make money?
Display ads (Google AdSense, Mediavine, Raptive), affiliate commissions on products they genuinely recommend, digital products like courses or templates, brand sponsorships in their niche, and freelance services. Most bloggers with sustainable income combine two or three streams. Ads and affiliates kick in earliest; products and sponsorships scale better at high traffic levels.
How long until a blog makes money?
Realistically 3–6 months before meaningful search traffic arrives; 6–12 months before consistent ad or affiliate income. SEO compounds. Posts that rank keep earning with no additional effort. One well-targeted post in a low-competition niche can accelerate the whole timeline significantly. Expect slow at first, then exponential growth as your domain authority builds.
How often should I post?
Quality always beats frequency. One well-researched 1,500-word post per week outperforms five 300-word filler posts in every measurable way. Start with a pace you can sustain for six months straight. Consistency matters more than volume. Drop to one post every two weeks before you publish filler just to hit a number.
What Kind of Blog Are You Starting?
The technical setup is identical no matter what you write about. However, your domain name, category structure, and content strategy will vary. Here is how this guide applies to the most common blog types.
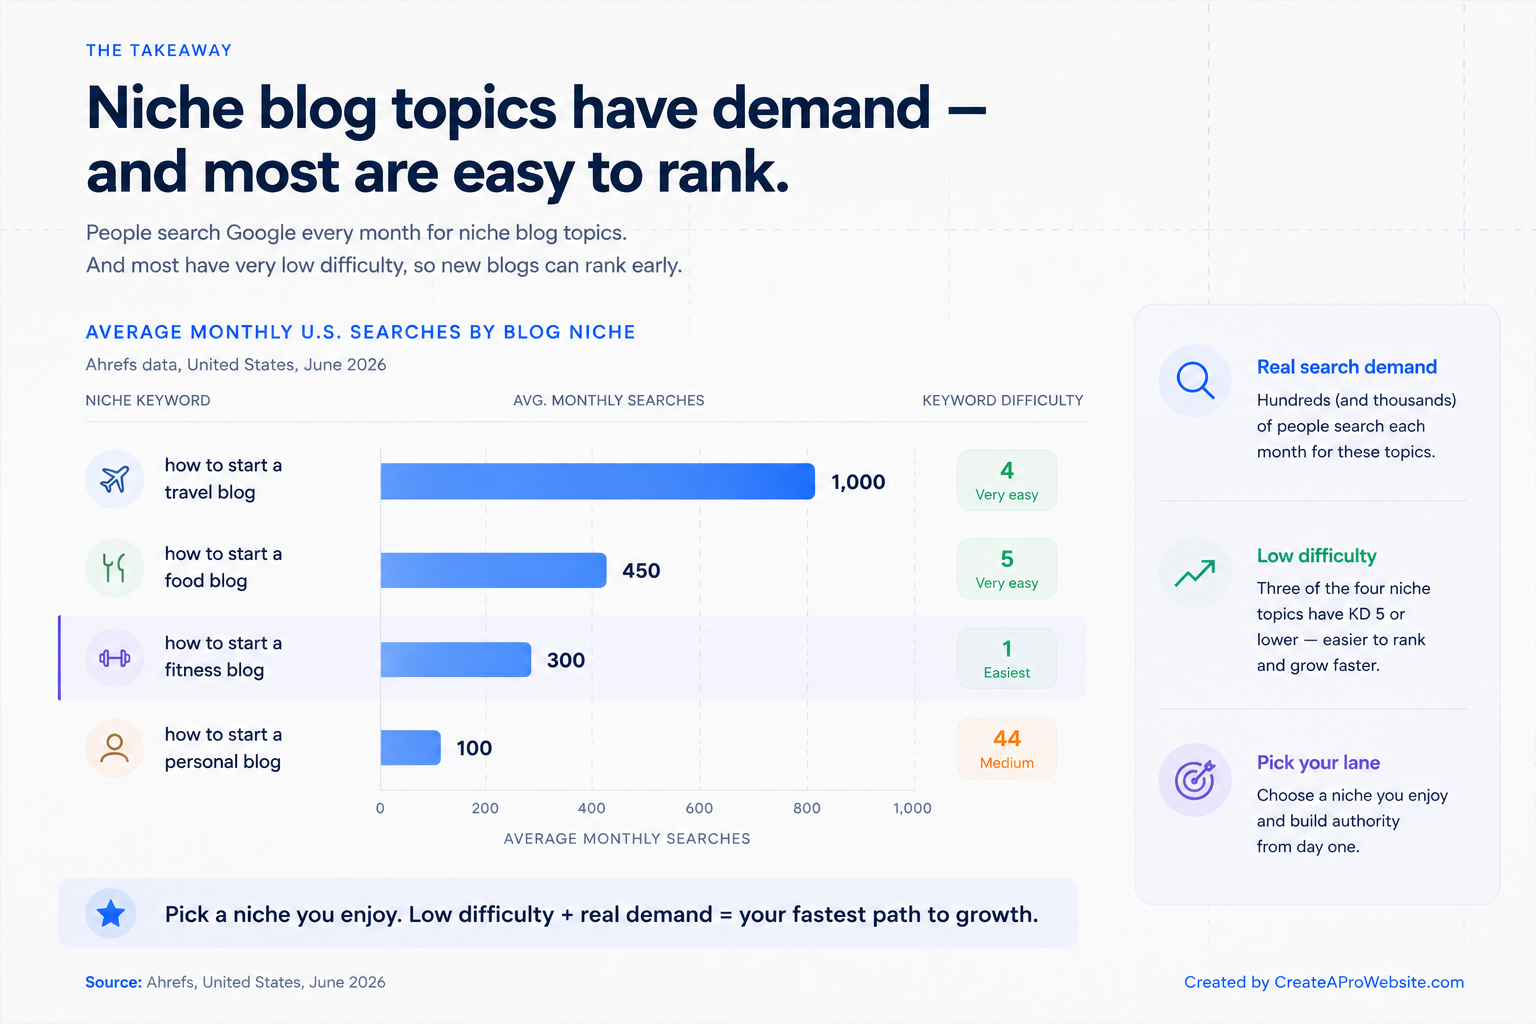
- Travel blog: destination guides, trip itineraries, budget travel tips. “How to start a travel blog” gets 1,000 monthly searches at a keyword difficulty of 4. One of the easiest niches to rank in from a new domain.
- Food blog: recipes, restaurant reviews, cooking techniques. “How to start a food blog” has very low competition and a massive, loyal readership base.
- Personal blog: your story, opinions, life updates. Works best when it carves out a clear perspective or niche within the personal format.
- Educational / how-to blog: tutorials, guides, explainers. Excellent for SEO because readers search for solutions to specific problems.
- Niche hobbyist blog: fitness, parenting, finance, gaming, DIY. Niche topics often have lower competition and more engaged readership than broad topics.
Whatever your niche, the platform choice matters more than the topic on day one. Own your platform, and then write.
You’re Live. Now Write.
That’s the full setup: WordPress, Astra, Elementor, Rank Math, and an email opt-in ready to capture subscribers from day one. The blog is yours. Your domain, your SEO, and your audience.
The mistake most new bloggers make is spending another week tweaking the design instead of publishing. Your first two posts don’t need to be perfect. They need to exist. Google can’t rank a blog that hasn’t published anything, and readers can’t find you if there’s nothing to find.
Pick one topic you know well, write a thorough post, hit publish, and do it again. That’s the whole strategy for the first 90 days. The design, the monetization, and the social all gets easier once you have content working for you.